Before proceeding, please ensure you have followed the steps outlined here: Getting Started
Create Blocklet from Scratch
If you want to start a new blocklet from scratch, please start with our prebuilt templates: https://www.arcblock.io/docs/createblocklet/en/quick-start
Create Blocklet from Existing Project
If you need to migrate existing project to the blocklet platform, refer to following steps (these steps should work for most javascript apps).
Generate blocklet.yml file
Go to the project directory, execute the blocklet init command in the terminal, and enter the project name, project description, and so on
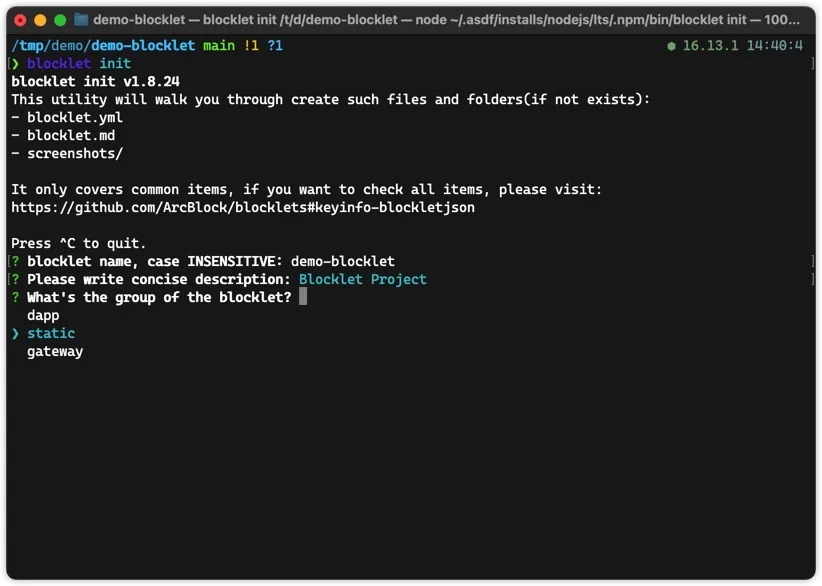
For blocklet group, select according to your project setup:
- "static": if your project is a simple webapp that ships just HTML/CSS/JS and runs only in browser, such as a simple vue/react webapp
- "dapp": if your project need Node.js as runtime when shipped to production, such as express/next.js apps.
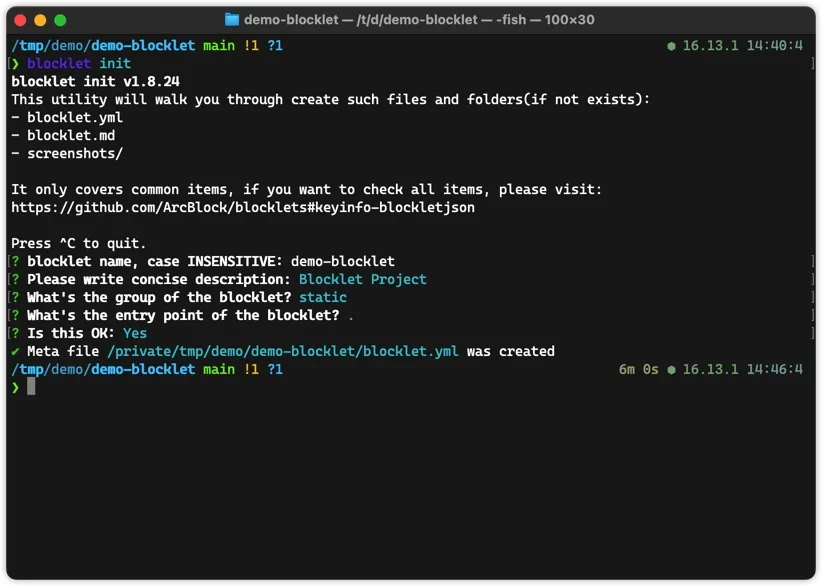
For blocklet entry point, input according to your project setup (this setup tells blocklet cli to include files in the final blocklet bundle):
- For "static" blocklets: just input the directory name after your webapp is built, such as "dist"
- For "dapp" blocklets: just input the entry point of your backend.
Config Blocklet Scripts
In the above steps, we have a blocklet.yml file that can be consumed by Blocklet Server.
Next, we configure some script commands to make it faster to develop and deploy your blocklet with Blocklet Server.
Configure the development commands in
blocklet.yml
Starting a Blocklet development environment requires the blocklet dev command, which relies on the configuration in blocklet.yml.
The following configuration needs to be added to blocklet.yml.
scripts:

dev: npm run start
To invoke development commands in a more familiar way, you can also add the command "dev": "blocklet dev" to scripts in the package.json file, and then you can use npm run dev to enter the Blocklet application development environment.
For more information on blocklet dev, see blocklet dev
Configure bundle command
We can use the blocklet bundle command to package the Blocklet application, but we need to use the project's original command to package it once before executing the command.
Assuming the project's original package command is npm run build, we can add "bundle": "npm run build && blocklet bundle --create-release" to the scripts in the package.json file, and then we can use the npm run bundle to quickly package Blocklet applications
For more information about blocklet bundle, please refer to blocklet bundle
Configure deploy commands
Add "deploy": "npm run bundle && blocklet deploy" to scripts in package.json file, then you can use npm run deploy command to package and deploy with one click.
For more information about blocklet deploy, you can refer to blocklet deploy
Configure the upload command
Add a "upload": "npm run bundle && blocklet upload" to scripts in package.json file, then you can use npm run upload command to package and publish with one click.
For more information about blocklet upload, see blocklet upload
Get Better Developing Experience
You can use following library to enhance your blocklet developing experience
Customize Blocklet Branding
- Update blocklet branding such as logo and screenshot: How to fix logo and screenshot ratio?
- Update blocklet title/description, just edit
blocklet.yml
Advanced Topics
- Using Blocklet Preferences to make your blocklet customizable
- Using Blocklet SDK (Node.js) to manage users/passports for your blocklet
- Using vite-plugin-blocklet to make your blocklet work on dynamic mountpoint
- Using blocklet.js to load blocklet runtime environments in the browser
- Using Image Service to serve images dynamically with resize/crop/convert support
- Using Blocklet Lifecycle scripts to do things when run your blocklet
When something went wrong?
Please contact us at: https://community.arcblock.io/, we are always here to help.