DID
Bloklet DID represents the Bundle ID after the Blocklet is packaged, specified by name and did.
name: example
did: z8iZrkWYbi3JU3AP9NHJQbBUdrgiRbeorauqf
name is a human readable ID, did is derived from name. Unique name derives unique did.
In general, did should not be modified manually, name and did should be automatically generated when the project is initialized via create-blocklet.
The same DID represents the same Bloklet when uploaded to the Blocklet Store.
When installing a Blocklet to the Blocklet Server, the same DID represents the same Bloklet.
Define Blocklet name please use title, do not use name
name follows the NPM Package Name specification
- blocklet name length should be greater than zero
- all the characters in the blocklet name must be lowercase i.e., no uppercase or mixed case names are allowed
- blocklet name can consist of hyphens
- blocklet name must not contain any non-url-safe characters (since name ends up being part of a URL)
- blocklet name should not start with . or _
- blocklet name should not contain any spaces
- blocklet name should not contain any of the following characters: ~)('!*
- blocklet name length cannot exceed 214
Version
version follows the semver version specification
version: 1.0.0Infomation
title: Example Demo
description: Demo blocklet that shows how to configure Blocklet Meta`
author:
  name: Bob
  email: bob@gmail.com
  url: 'https://bob.me'
contributors:
  - name: Alice
    email: alice@gmail.com
    url: 'https://alice.me'
maintainers:
  - name: Zhangsan
    email: zhangsan@gmail.com
    url: 'https://zhangsan.me'
community: 'https://github.com/orgs/blocklet/discussions'
documentation: 'https://arcblock.io/docs/blocklet-developer'
homepage: 'https://www.blocklet.io'
license: MIT
keywords:
  - demo
  - example
  - blocklet
repository:
  type: git
  url: 'git+https://github.com/blocklet/blocklet-site.git'
support: support@arcblock.io
Logo
App logo file
logo: logo.pngScreenshots
The screenshots will be displayed on the introduction page of the store
screenshots:
  - 0.png
  - 1.png
  - 2.png
Videos
The link to the video introduction will be displayed on the store's introduction page, supporting up to three links. Supported websites: Youtube, Vimeo
videos:
  - https://www.youtube.com/watch?v=K-J7qU1CNSo
  - https://vimeo.com/919738412
Price
Blocklet price
price: Specify the token address and quantityshared: How the revenue is shared. Usually you don't need to define it yourself, the system will by default distribute Blocklet revenue to developer and store according to 7
payment:
  price: # Only 1 token can be specified
    - address: z35n6UoHSi9MED4uaQy6ozFgKPaZj2UKrurBG # token address
      value: 8 # price
  share: # Usually you don't need to define it yourself
    - name: Bob # account alias
      address: z1QUDFzp6wKhLFjV4sG1ACY3J3ePcknrviy # Account DID
      value: 0.7 # split ratio
    - name: Store # Account alias
      address: zNKr4EeqcMk4W4TpBYD7MzGj6UEua53vJFx1 # Account DID
      value: 0.3 # split ratio
Component price
Component Price refers to the selling price of the Blocklet when it is combined
type:- Fixed price:
fixed - Divide proportionally:
percentage value- When type is fixed, it refers to the selling price
- When type is percentage, it refers to the percentage
parentPriceRangethe price range of the parent component
payment:
  componentPrice:
    - parentPriceRange: # The price range of the parent component
        - 0
        - 10
      type: fixed
      value: 2 # fixed price
    - parentPriceRange:
        - 10
        - 20
      type: percentage
      value: 0.2 # divide proportionally
    # When parentPriceRange is not specified, it indicates the default division method
    - type: fixed
      value: 4
Files
Which files need to be packaged into the bundle
files:
  - logo.png
  - screenshots
  - hooks
Interfaces
Blocklet access interface (most of the following configurations do not need to be concerned, just focus on the auth configuration)
interfaces:
  - type: web # access interface type
    services:
      - name: auth # Auth service for this access interface
        config:
          whoCanAccess: all # Who can access (Can be modified dynamically after app installed)
          blockUnauthenticated: false # Whether to automatically intercept unauthenticated requests and jump to the login page (default: false)
          blockUnauthorized: false # Whether to automatically intercept unauthorized requests (default: false)
          allowSwitchProfile: true # Whether to support switching profiles (default: true)
          profileFields: # Information to provide when logging in
            - fullName
            - email
            - avatar
          ignoreUrls: # Which urls allow public access
            - /public/** # every urls unser /public allow public access
            - /api/xxx # /api/xxx allows access
    protocol: http # access interface type
    name: publicUrl # usually does not need to be modified
    port: BLOCKLET_PORT # Environment variable for receiving port (port number is generated by Blocklet Server)
    path: / # Default prefix when Bloclet receives requests
    prefix: '*' # Blocklet is mounted prefix
Environment
Blocklet runtime environment variables are defined with environments:
environments:
  - name: key # variable name
    description: xxxx # variable description
    default: '' # default value
    required: false # Is it required
    secure: false # Whether it is sensitive information
    shared: true # Is it public. Defaults to true, shared must be false when secure is true
Following rules applies to environments:
- They can have default values
- They can be changed in blocklet dashboard and during blocklet launch process.
- Shared environment variables are merged in blocklet composition
- Variable names can not start with
ABT_NODE_orBLOCKLET_except a few exceptions: BLOCKLET_PASSPORT_COLORblocklet passport color, can be any valid hex encoded color stringBLOCKLET_WALLET_TYPEcan beethordefault, if your blocklet works on ethereum, should set this toethBLOCKLET_APP_LOGOURL or path to the running blocklet instance logo, defaults to blocklet logo
Scripts
Configuring Blocklet Hook Directives
scripts:
  dev: npm run start # The command actually executed when `blocklet dev` is executed
  preInstall: node hooks/pre-install.js # hooks before installation
  postInstall: node hooks/post-install.js # hook after installation
  preStart: node hooks/pre-start.js # hook before startup
  preStop: node hooks/pre-stop.js # hook before stop
  preUninstall: node hooks/pre-uninstall.js # Hook before deletion
  postStart: node hooks/post-start.js # 启动后的 hook
  preConfig: node/hooks/pre-config.js # 配置前的 hook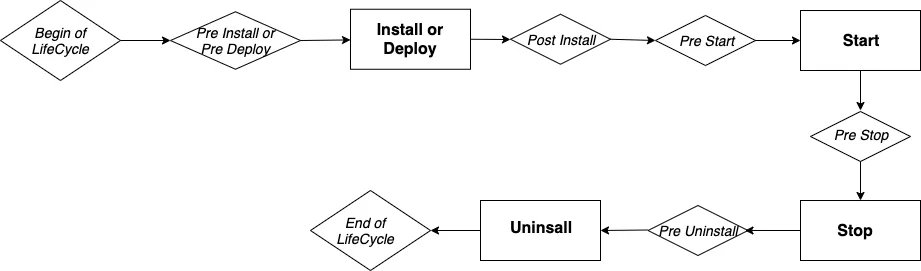
Blocklet Server provides hook functionality to do something during the execution life cycle. Currently includes: pre-install, post-install, pre-start, post-start, pre-stop, pre-uninstall, pre-config These Hooks.
For example, a blocklet has hardware requirements for the machine to run on: the memory cannot be less than 1G, and the available disk capacity cannot be less than 500 MB. At this time, you can use the pre-install hook to detect whether the target machine has met the requirements, if so, install it normally, otherwise throw an error message and terminate the installation.
Hooks are actually some shell scripts, and these scripts may refer to files in Blocklets. During the process of packaging Blocklets, the Blocklet Server packaging tool (Blocklet Server CLI) will package the files used by hooks separately. Therefore, developers need to Declare in hookFiles which files are referenced by hooks.
Requirements
Configure required resources and operating environment constraints
requirements:
  server: '>=1.8.0' # server version constraints
  os: '*'
  cpu: '*'
  nodejs: '*'
  fuels: # Fuel needed before starting (token)
    endpoint: xxx # The address of the chain
    address: xxx # token address
    value: xxx # price
    reason: xxx # The reason for the need (for example, because the NFT Factory needs to be created before the first boot)
Specify the fuel needed before starting (token)
requirements:
  fuels:
    endpoint: xxx # The address of the chain
    adress: xxx # token address
    value: xxx # price
    reason: xxx # The reason for the need (for example, because the NFT Factory needs to be created before the first boot)
Specify the minimum Blocklet Server version number
requirements:
  server: '>=1.8.0' # server version must be greater than or equal to 1.8.0
Specify the minimum Nodejs version number
requirements:
  nodejs: '>=18.0.0' # Nodejs version must be greater than or equal to 18.0.0
Capabilities
capabilities:
  clusterMode: false # Can blocklet be started in cluster mode
  component: true # Can blocklet become a component and be composed by other blocklets
  didSpace: "optional" # This option is optional and indicates whether the data needs to be stored in the did space or not, the range is: ["optional", "required"]. To learn more, please refer to: https://github.com/ArcBlock/did-spaces/blob/master/docs/blocklet-integration-did-spaces.md
  navigation: true # Can blocklet inject menu into navigation
  serverless: boolean optional, # Whether the blocklet can be installed in the “On-Demand Space” of the Launcher. Optional.
  sitemap: boolean # Whether the blocklet supports composable sitemap. Optional
Components
Demo: Component Demo
components: # Usually no manual maintenance is required, it can be maintained through `blocklet add/remove`
  - name: xxx # Human readable ID (required)
    source: # installation source
      # install via url
      url: xxx
      # install via store
      store: xxx # store address
      name: xxx # Blocklet ID
      version: xxx # Blocklet version
    mountPoint: /path/to # mount point
    title: xxx # name
    description: xxx # description
Config Source
components:
  - name: c1
    mountPoint: /c1

    # source has two types

    # 1. url: equivalent to the previous resolved, can be any bundle url, no need to serve in the store, such as
    # can serve in a github release, or in a local disk
    source:
      url:
- https://store.blocklet.dev/api/blocklets/z8ia4e5vAeDsQEE2P26bQqz9oWR1Lxg9qUMaV/blocklet.json
- file:///Users/wangshijun/Develop/arcblock/nft-store/.blocklet/release/blocklet.json
  - name: c2
    mountPoint: /c2
    # 2. The bundle served in the store can control the version: you can specify the latest version (default) or a fixed version. Later, if necessary, it can support more forms `^x.x.x`, `~x.x.x`, etc.
    # Because the store is decentralized, you need to specify the store
    source:
      store: https://store.blocklet.dev
      name: static-demo # bundle name
      version: latest # latest, 1.3.0
  - name: c3
    mountPoint: /c3
    # url can be set to one or more, when the first url is abnormal, it can be downgraded to the following url
    source:
      url:
        - <primary url>
        - <redundant url>
  - name: c4
    mountPoint: /c4
    # Store can be set to multiple, when the first store is abnormal, it can be downgraded to the following store
    source:
      store:
        - https://store.blocklet.dev
        - https://another-store.blocklet.dev
      name: static-demo
      version: latest
Navigation
navigation: # navigation information (app map)
  - id: xxx # navigation id, must be unique, use javascript varable named rules: https://www.npmjs.com/package/is-var-name
    title: xxx name
    # link to a url
    link: xxx
    # link to component
    component: xxx # component name or did
    section: # where I want to show
      - header
      - footer
    icon: mdi:home # icon
i18n
id: xxx
title: xxx
link: xxx
or
id: xxx
title:

zh: xxx

en: xxx
link:

zh: xxx

en: xxx
Header and Footer
navigation:
  - id: a
    title: a # appears in the header (default)
  - id: c
    title: c
    section: footer # only in footer
  - id: d
    title: d
    section: # both in header and footer
      - header
      - footer
  - id: e
    title: e
    section: social # in footer's social media
  - id: f
    title: f
    section: bottom # at the bottom of the footer
Icon
navigation:
  - id: a
    title: a
    icon: mdi:home # iconify style
  - id: aa
    title: a
    icon: 'https://xxx' # url
  - id: b
    title: b
    icon: '/path/to/xxx' # icon serve in app
Note
To display iconify style icons, the front end needs to import @iconify/iconify
Theme
theme: # theme
  background: '#f5f5f5' # background color
Background
background: xxxor
background:
  header: xxx
  footer: xxx
  default: xxx
Copyright
copyright: # Copyright information
  owner: xxx # owner
  year: 2022 # If not written, take the current year
Types
Specify the Blocklet type through group, and specify the Blocklet startup entry through main
There are three types of Blocklets
Type: Static
Contains only static resources. At startup, the purely static Blocklet will be hosted by the static resource service built into the Blocklet Server
group: static
main: www # path of static resources, you need to ensure that dist/index.html exists
Type: Dapp
This type of Blocklet itself contains back-end services (it can also contain static resources at the same time). At startup, the DAPP-type Blocklet will start the service at the port number assigned by the Blocklet Server.
Note
Blocklets of DAPP type need to specify the blocklet development environment startup entry through scripts.dev
group: dapps
main: index.js # startup file
scripts:
  dev: npm run dev
Type: Gateway
This type of Blocklet itself will not contain any code and services, it will only compose other Blocklets together
group: gatewayOthers
timeout:
  start: 60 # Start timeout. Unit: second. Default time: 1 minute.
Config Services
The service configuration of Parent blocklet and Component blocklet are independent, not unified.
For the specific configuration method of services, see https://github.com/blocklet/blocklet-specification/blob/main/docs/meta.md
Parent blocklet services
- Parent blocklet services are configured in
interface.servicesin parent blocklet.yml
Component blocklet services
- Component blocklet services are configured in
interface.servicesin component blocklet.yml - When
components[].servicesis configured in parent blocklet.yml, it will be merged with component blocklet.ymlinterface.services
Examples of merger strategies:
parent blocklet.yml:
name: parent-blocklet
interfaces:
  - name: publicUrl
    type: web
components:
  - name: component-blocklet
    mountPooint: /path/to/xx
    services:
      name: s1
      name: s2
component blocklet.yml:
name: component-blocklet
interfaces:
  - name: publicUrl
    type: web
    services:
      - name: s2
      - name: s3
Then the services of component blocklet are:
- s1 (from parent
components[].services) - s2 (from parent
components[].services) - s3 (from component
interface.services)