Using local database
Local Storage
你可以使用 Blocklet SDK 获取 blocklet 的存储目录
const fs = require('fs');
const { env } = require('@blocklet/sdk');

fs.writeFileSync(path.join(env.dataDir, 'data.txt'), 'blocklet data');
File Database
Blocklet SDK 为 blocklet 提供一个基于文件的数据库
Note
TODO: ## Using browser database
Note
TODO: ## Using Remote database
Note
TODO: ## Using decentralized data store
Using ORM
Prisma + SQLite(deprecreated)
Prerequisites
You need Node.js v14.17.0 or higher for this guide (learn more about system requirements).
1. Initialization prisma
The first step is to install the prisma dependency in your project:
yarn add prisma -DExecute the following command to initialise prisma and use SQLite as your database:
npx prisma init --datasource-provider sqliteAt this point, a new prisma directory and .env file will be created in the project root, and SQLite will be configured as your database。
2. Database modelling
We now need the database to be modelled in order to describe the data we store.
Add the user model to the file prisma/schema.prisma with the following content:
// This is your Prisma schema file,
// learn more about it in the docs: https://pris.ly/d/prisma-schema

generator client {
  provider = "prisma-client-js"
  // Note, please do not customise the output parameters of the generator, there is currently a bug, see: https://github.com/prisma/prisma/issues/13233
}

datasource db {
  provider = "sqlite"
  url      = env("DATABASE_URL")
}

// 添加用户模型
model User {
  id    String  @id @default(uuid())
  email String  @unique
  name  String?
}
If you are using vscode as your development tool, you can install the prisma plugin to get a better coding experience when modelling.
You can use the npx prisma format command to help you format the schema.prisma file and verify where the error occurred.
Warning
Note, please do not customize the generator's output parameter, it is currently buggy, see: https://github.com/prisma/prisma/issues/13233
3. Creating databases and data tables
At this point, you already have a model of the database, but you have not yet created the data and data tables. You will need to run the following command to create the database and data tables:
npx prisma migrate dev --name init // Execution in local environment onlyThis order does two things:
- it creates a new SQL migration file
prisma/migrationsin the directory for this migration. 2. it runs the SQL migration file against the database. - It runs the SQL migration file against the database.
Since the SQLite database file did not exist before, the command also created it in the prisma directory with the name dev.db defined by the environment variable in the .env file.
Congratulations, you have now created your database and data tables. Now let's start learning how to manipulate the data using the Prisma Client.
4. Adding, deleting and checking data using Prisma Client
To manipulate the database you can import @prisma/client to do this, create the test.js file and add the following code to it:
const { PrismaClient } = require("@prisma/client");
const prismaClient = new PrismaClient();

async function main() {
  // Delete records
  const batchPayload = await prismaClient.user.deleteMany();
  console.log("delete", batchPayload.count);

  // Create a record
  const user = await prismaClient.user.create({
    data: {
      email: "2565978507@qq.com",
      name: "skypesky",
    },
  });
  console.log("create", user);

  // Update records
  const updatedUser = await prismaClient.user.update({
    where: {
      email: "2565978507@qq.com",
    },
    data: {
      name: "skypesky666",
    },
  });
  console.log("update", updatedUser);

  // Query records
  const users = await prismaClient.user.findMany();
  console.log("find", users);
}

main();
Then, execute the script using the following command:
node test.jsYou can see the following output in the terminal:
delete 0
create {
  id: '1736c1c1-7560-4d7d-9b04-dcc6dd1dd1fb',
  email: '2565978507@qq.com',
  name: 'skypesky'
}
update {
  id: '1736c1c1-7560-4d7d-9b04-dcc6dd1dd1fb',
  email: '2565978507@qq.com',
  name: 'skypesky666'
}
find [
  {
    id: '1736c1c1-7560-4d7d-9b04-dcc6dd1dd1fb',
    email: '2565978507@qq.com',
    name: 'skypesky666'
  }
]
If you want to know more about the usage of CRUD, please refer to: https://www.prisma.io/docs/concepts/components/prisma-client/crud
5. Visualisation of data in Prisma
Prisma comes with a built-in GUI for viewing and editing data in the database. You can open it using the following command:
npx prisma studioAt this point, the terminal will output the address of prisma studio:
Environment variables loaded from .env
Prisma schema loaded from prisma/schema.prisma
Prisma Studio is up on http://localhost:5556
Use your browser to access prisma studio and you should be able to see all the records in the user data table:
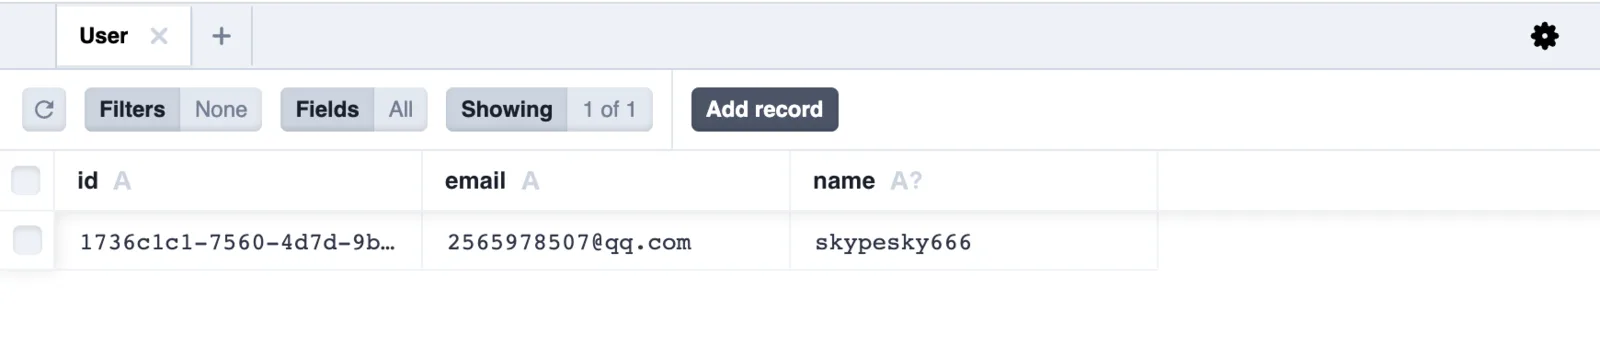
6. Deployment to the official environment
First we need to generate the Prisma Client using the following command:
npx prisma generate // Generate @prisma/client client, recommended under pre-install hookNext, we need to execute the following command in the terminal to complete the migration of the generated environment database:
npx prisma migrate deploy // All migration scripts will be applied in the official environment and it is recommended that this is done under the pre-install hookThe code for the pre-install.js file can be found in the following example:
require('dotenv-flow').config();
const { name } = require('../../package.json');
const urljoin = require('url-join');
const exec = require('shelljs.exec');
const { logger } = require('../../libs/logger');
const env = require('@blocklet/sdk/lib/env');

async function createSqliteDatabase() {
  const schemaUrl = urljoin(process.cwd(), 'prisma/schema.prisma');
  // Note: npx may run an unexpected cached version of prisma,
  // so it is recommended to use "latest" or a specified version for prisma here.
  exec(`npx prisma@latest generate --schema ${schemaUrl}`);

  if (process.env.DATABASE_URL) {
    return;
  }

  process.env.DATABASE_URL = `file:${urljoin(env.dataDir, 'db/prd.db')}`;

  // @see: https://www.prisma.io/docs/concepts/components/prisma-migrate/db-push#can-i-use-prisma-migrate-and-db-push-together
  exec(`npx prisma@latest migrate deploy --schema ${schemaUrl}`);
}

(async () => {
  try {
    await createSqliteDatabase();
  } catch (err) {
    logger.error(`${name} pre-start error`, err.message);
    process.exit(1);
  }
})();
This completes the deployment of prisma and SQLite in the official environment!
FAQ
- Error when using prisma
Prisma only supports Node.js >= 14.7andError: ENOENT: no such file or directory, open 'xxx/schema.prisma'
Tip
This is because the node.js version is too low, just upgrade the node.js version to 14.17 or higher and restart the blocklet server to fix the problem.