The blocklet init command is an interactive utility that helps you create the fundamental structure for a new blocklet within an existing directory. It generates the core blocklet.yml metadata file and other essential boilerplate, turning your current folder into a functional blocklet project.
This command is ideal when you want to start a blocklet from scratch or convert an existing project (e.g., one that already has a package.json) into a blocklet. If you prefer to start from a pre-built template, see the blocklet create command.
Interactive Walkthrough
When you run blocklet init in your project directory, the CLI will guide you through a series of questions to configure your blocklet's metadata.
Terminal
blocklet initThe process looks like this:
This utility will walk you through create such files and folders(if not exists):
- blocklet.yml
- blocklet.md
- screenshots/

It only covers common items, if you want to check all items, please visit:
https://github.com/ArcBlock/blocklets#keyinfo-blockletjson

Press ^C to quit.
? blocklet title: (my-blocklet) my-first-blocklet
? Please write concise description: A new Blocklet project.
? What's the group of the blocklet? dapp
? What's the entry point of the blocklet? (index.js)

Is this OK: (Y/n) Y

Meta file .../my-blocklet/blocklet.yml was created
Doc file .../my-blocklet/blocklet.md was created
Screenshots dir .../my-blocklet/screenshots/ was created
.../my-blocklet/logo.png was created
.../my-blocklet/index.js was created
Prompts Explained
| Prompt | Description |
|---|---|
title | The human-readable name of your blocklet. This is used for display purposes. Defaults to the current directory's name. |
description | A brief, one-sentence summary of what your blocklet does. |
group | The type or category of the blocklet. The available options are dapp, static, api, and gateway. |
main | The entry point for your blocklet's code. For dapp blocklets, this is typically a script like index.js. For static blocklets, it's the directory containing your static assets (e.g., .). |
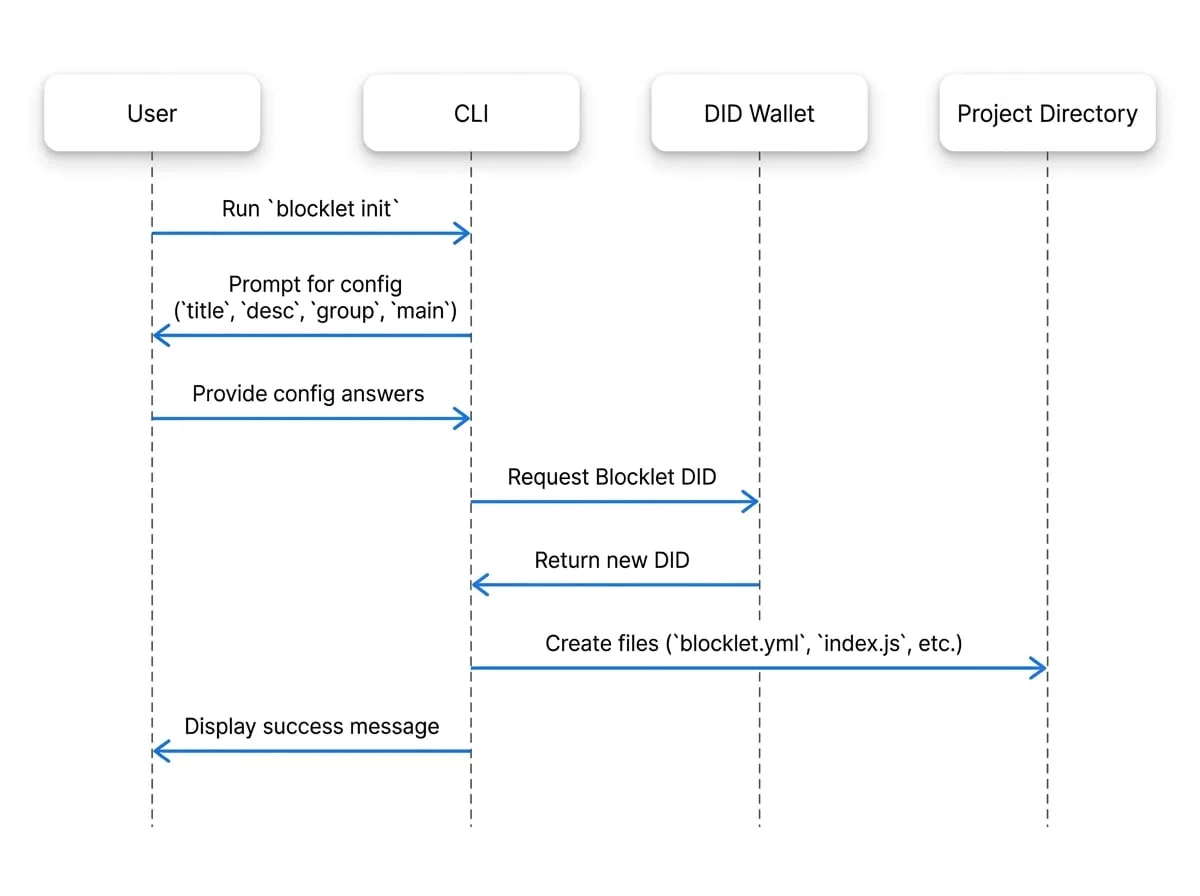
The Initialization Process
The command performs several key steps to set up your project, including generating a unique Decentralized ID (DID) for your blocklet by connecting to a DID wallet.
Generated Files
After a successful initialization, you will find the following files and directories in your project:
blocklet.yml: The most important file. It contains all the metadata for your blocklet, such as its name (which is its DID), title, description, and version. blocklet.ymlyaml name: 'z8iZz5de8e9a6f8f2b3c1d9e2f7g2h1i8j3k4l5m' version: '0.1.0' title: 'my-first-blocklet' description: 'A new Blocklet project.' group: 'dapp' main: 'index.js' author: 'Your Name <your.email@example.com>' specVersion: '1.16.0' did: 'z8iZz5de8e9a6f8f2b3c1d9e2f7g2h1i8j3k4l5m' logo: 'logo.png' scripts: dev: 'node index.js'blocklet.md: A placeholder Markdown file for your blocklet's detailed documentation and description, which will be displayed in the Blocklet Store.screenshots/: An empty directory where you can place screenshots of your blocklet for display in a blocklet store.logo.png: A default logo image for your blocklet.
- Entry Point File: Depending on the
groupyou selected: - For
dapp, anindex.jsis created with a simple Node.js HTTP server. index.jsjavascript const http = require('http'); const server = http.createServer((req, res) => { res.statusCode = 200; res.setHeader('Content-Type', 'text/plain'); res.end('Hello Blocklet\n'); }); const port = process.env.BLOCKLET_PORT || 3000; server.listen(port, () => { // eslint-disable-next-line no-console console.log(`Server running at http://127.0.0.1:${3000}/`); }); - For
static, anindex.htmlis created. index.htmlhtml <!DOCTYPE html> <html> <head> <title>Hello Blocklet</title> </head> <body> <h1>Hello Blocklet</h1> </body> </html>
- For
.gitignore: A basic.gitignorefile is added to prevent common build artifacts and dependencies from being committed to version control.
Command Options
You can modify the behavior of blocklet init with the following flags.
| Option | Alias | Description |
|---|---|---|
--yes | -y | Skips the interactive prompt and accepts all default values. This is useful for scripting. |
--force | -f | An alias for --yes. |
--did <did> | Provide a specific Blocklet DID to use, skipping the automatic generation step. |
Example: Non-interactive Initialization
To quickly initialize a project without answering prompts, use the -y flag. The command will use defaults derived from your package.json (if it exists) or the directory name.
Terminal
blocklet init -yOnce your project is initialized, you're ready to start building. The next step is to run your blocklet in a local development environment.