Getting Started
Use this guide as the fastest path to a working site: install the AIGNE CLI, gather source materials, run aigne web generate, approve the plan, and review the generated pages—all in one place.
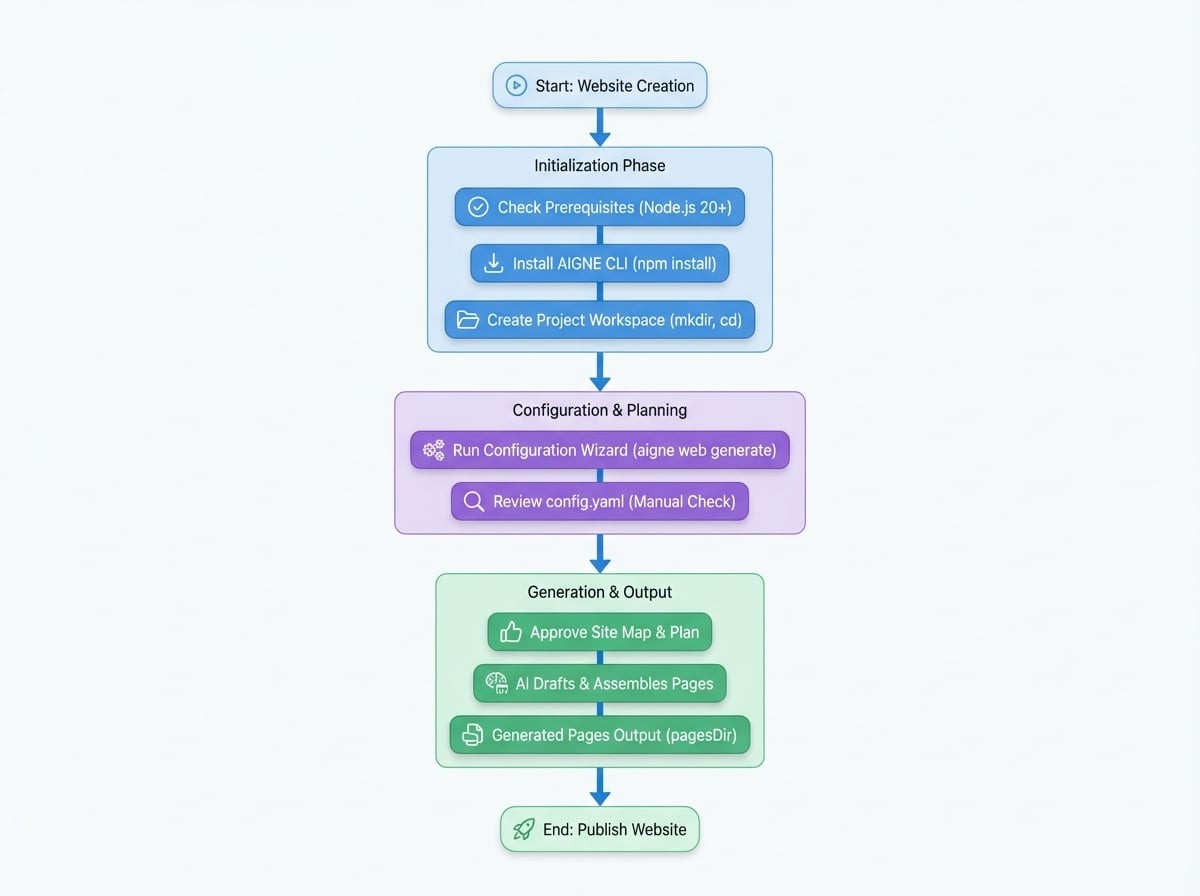
See the end-to-end flow#
Prerequisites#
- Node.js 20 or newer (npm is included). Check with
node -v. - AIGNE account (optional). You can use the hosted models that ship with the AIGNE CLI without adding API keys.
- Source material that describes your product or service. For a deeper checklist, read the Prepare Materials guide.
Step 1. Install and verify the AIGNE CLI#
Install the AIGNE CLI globally so the aigne command is available from any folder:
Install AIGNE CLI
npm install -g @aigne/cliVerify that installation succeeded:
--help
aigne web --helpNeed the beta channel? Install with npm install -g @aigne/cli@beta and run aigne web upgrade --beta to pick up the latest agents.
Step 2. Create a project workspace#
Set up a clean directory for your first site and switch into it:
Create workspace
mkdir my-first-websmith-site
cd my-first-websmith-site
Copy or create the documents, briefs, and media you want the AI to read inside this folder (or a nearby sources directory). Well-defined materials dramatically improve output quality, so spend a few minutes following the preparation checklist.
Step 3. Run aigne web generate#
From the project directory, start the generator:
Generate website
aigne web generateBecause this is a new workspace, WebSmith launches an interactive wizard that captures:
- Website purpose - e.g., SaaS marketing site, documentation hub, investor update.
- Target audiences - developers, customers, investors, etc., so tone and proof match the reader.
- Website scale - choose minimal, standard, comprehensive, or let the AI decide.
- Languages - pick the primary locale and any translations to produce.
- Pages directory - where generated files are stored (defaults to
aigne/web-smith/pages). - Source paths - directories or files that contain your product knowledge.
- Custom rules - constraints such as tone, terminology, or compliance reminders.
Your answers are written to .aigne/doc-smith/config.yaml so future runs can reuse them.
Step 4. Review the configuration#
Open the generated config and sanity-check the values, especially sourcesPath. Below is a trimmed example:
config.yaml
projectName: My Awesome Project
projectDesc: This is a project that does amazing things.
pagePurpose:
  - saas
targetAudienceTypes:
  - developers
websiteScale: standard
locale: en
pagesDir: aigne/web-smith/pages
sourcesPath:
  - ./docs
  - ./briefs/product-overview.md
  - ./evidence
rules: >
  Use confident, concrete copy. Highlight 99.99% uptime and SOC 2 compliance.
Important:
sourcesPathcontrols everything the AI can reference. Point it to the exact directories that contain your briefs, specs, pricing sheets, and proof so the generated copy is accurate.
Step 5. Approve the plan and inspect pages#
After reading your config, WebSmith proposes a site map (pages, sections, and key talking points). Approve it to let the AI draft content and assemble the Astro/React templates. When the run finishes you will see:
- Generated files inside the
pagesDiryou selected. - Logs for each page that show which source files were used.
- Suggestions for next actions (publish, translate, or iterate).
Open the generated pages locally or continue straight to the Publish Website guide to push them live.