Prepare Materials
Great websites start before you run aigne web generate. This guide gives you a concrete checklist for collecting briefs, source docs, and proof so WebSmith can build pages that reflect your requirements, cite the right evidence, and require fewer revision cycles.
The preparation workflow#
Here's how the process flows from gathering materials to getting your first website:
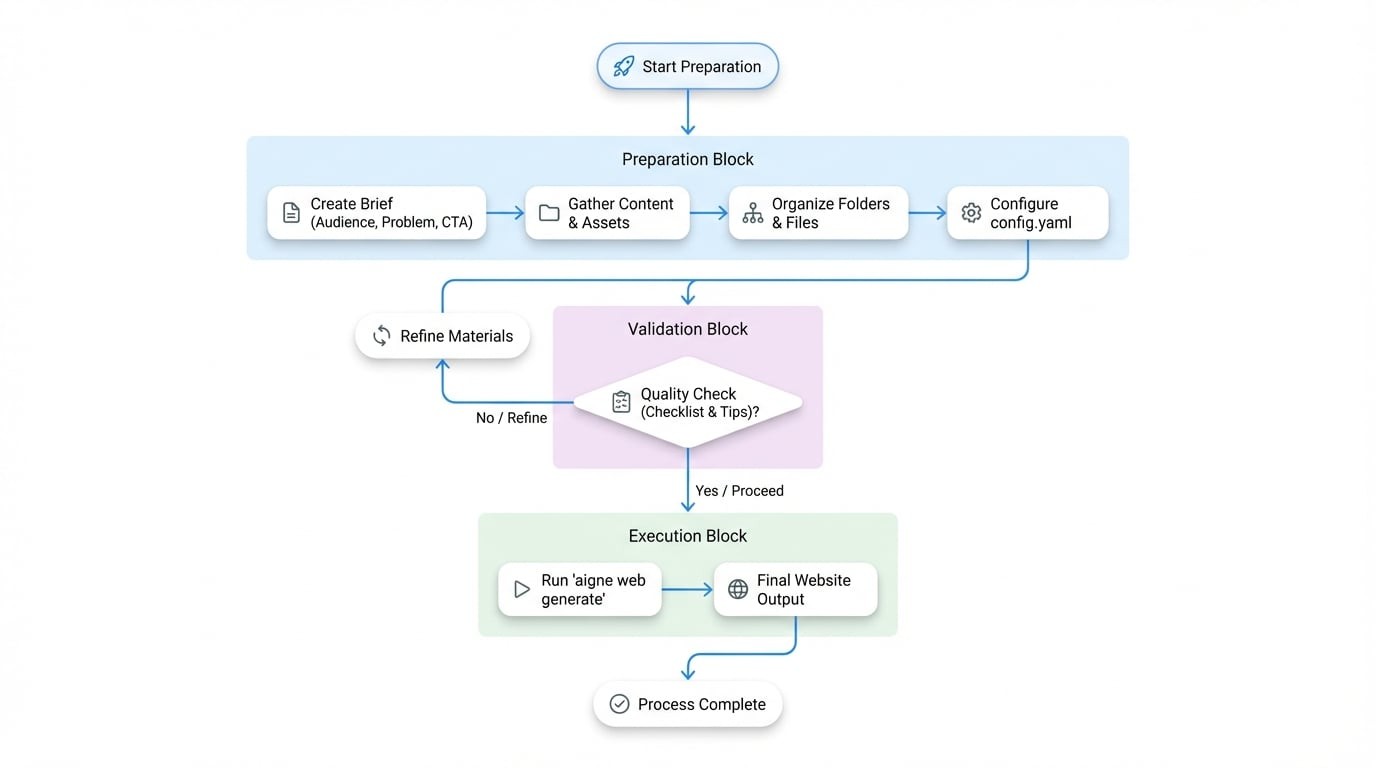
Each step builds on the previous one. Better inputs mean better output—it's that simple. A well-organized content kit helps WebSmith create authoritative, on-brand pages from the start.
Step 1. Start with the essentials#
Create a short brief that answers these four questions. A simple Markdown or Word doc works perfectly:
Question | Why it matters | Example |
|---|---|---|
Audience | Tone, vocabulary, and proof should match who will read the page. | "Growth-stage fintech founders and their engineering leads." |
Problem | Forces clarity on the pain you solve. | "Manual onboarding creates 10+ hours of repetitive compliance reviews." |
Differentiator | Keeps the copy from sounding like every competitor. | "Only platform with KYC + KYB automation built on regional data lakes." |
Primary CTA | Aligns every section toward a single conversion action. | "Book a 20-minute integration review." |
Save this file inside the project so you can add it to sourcesPath.
Step 2. Gather your content and assets#
WebSmith works with what you give it. The more relevant material you provide, the better your website will be. Organize these items into a sources directory:
Recommended content types#
Content Type | Description | Example |
|---|---|---|
Product Documents | Feature breakdowns, architecture notes, API references, pricing explanations. |
|
Marketing Plans | Positioning, messaging house, campaign briefs, competitor summaries. |
|
Business Plans | Mission, vision, roadmap, funding milestones, leadership bios. |
|
Existing Content | Blog posts, FAQs, changelogs - anything that shows tone or repeatable stories. |
|
Media Files | Logos, product screenshots, team photos, charts. |
|
Supported formats#
Category | Formats |
|---|---|
Text |
|
Documents |
|
Images |
|
Code |
|
Step 3. Organize for clarity#
Group your files logically. This makes it easy for both you and WebSmith to find what's needed.
project-sources/
project-sources/
├── 01_briefs/
│   ├── product-overview.md
│   └── audience-matrix.md
├── 02_proof/
│   ├── testimonials.md
│   └── security-metrics.xlsx
├── 03_assets/
│   ├── logo.svg
│   └── dashboard.png
└── 04_content/
    ├── blog/
    └── faq.md
Use descriptive folder names and prefixes. It should be obvious at a glance what each directory contains.
Step 4. Connect your sources in config.yaml#
Point the sourcesPath array at the directories (or specific files) you just organized. This is the single most important configuration parameter.
config.yaml
sourcesPath:
  - ./project-sources/01_briefs
  - ./project-sources/02_proof
  - ./project-sources/03_assets
pagePurpose:
  - saas
targetAudienceTypes:
  - businessOwners
  - developers
rules: >
  Highlight 40% cost savings backed by customer quotes. Mention SOC 2 + ISO 27001.
When you run aigne web generate, WebSmith recursively reads those folders, chunks the files, and cites them while writing copy and assembling layouts.
Choose your approach#
How much time do you have? Pick the approach that fits your situation.
Quick start: Just need a demo?#
Perfect for when you need something up fast and can refine it later.
- Start with a well-written README (~500+ words) and a few screenshots
- Add them to
sourcesPath - Run
aigne web generate, review the result, and iterate once - Great for prototypes, internal demos, or testing the waters
Recommended: Building something real#
This is the sweet spot for most teams launching a real product or service.
- Document your audience, problem, differentiation, and CTA
- Build a value matrix for each persona with functional + emotional proof
- Outline each page section by intent before letting WebSmith write
- Package testimonials, metrics, and screenshots as separate files
- After generation, verify each section hits its goal, then refine and re-run
Advanced: Team knowledge base#
For teams shipping multiple sites or maintaining long-term content systems.
- Split your expertise into focused Markdown files organized by topic
- Example structure:
knowledge-base/
├── foundation/
│   ├── mission.md
│   └── brand-voice.md
├── products/
│   ├── payments-overview.md
│   └── payments-technical-specs.md
├── proof-points/
│   ├── case-study-fintech-x.md
│   └── g2-reviews.md
└── audiences/
    ├── developer-persona.md
    └── operator-persona.md
This approach scales beautifully:
- Mix and match directories for different projects
- Every site pulls from a single source of truth
- Update one file (
case-study-fintech-x.md) and it automatically improves every website that references it
Quality checklist#
Before you run generate, make sure:
- Every claim is backed by a data point, quote, or metric in your source files
- Personas and CTAs are documented separately from marketing copy
- Assets have descriptive names (
dashboard-dark.png, notimage1.png) - Sensitive or internal-only files are excluded (WebSmith reads everything you point to)
- Source docs contain knowledge; style guidance goes in the
rulesfield
Tips for best results#
WebSmith is designed to generate great websites in one shot—but the quality depends on what you feed it.
- Provide concrete details. The more specific your source materials (data points, quotes, metrics), the more authoritative your website will be.
- Break content into focused files. Instead of one massive document, organize topics into smaller files. This helps WebSmith cite sources precisely and generate more structured content.
- Separate content from instructions. Put your knowledge in source files, but keep layout and tone directives in the
rulesfield where they belong.