Terminal Player
The Terminal Player is a specialized component used to display interactive, pre-recorded terminal sessions on your website. This component is an effective tool for demonstrating command-line instructions, showcasing software installations, or guiding users through technical processes in a clear and replayable format.
This component utilizes recordings created in the asciinema format, which ensures a lightweight, text-based capture of the terminal output.
Overview of the Process#
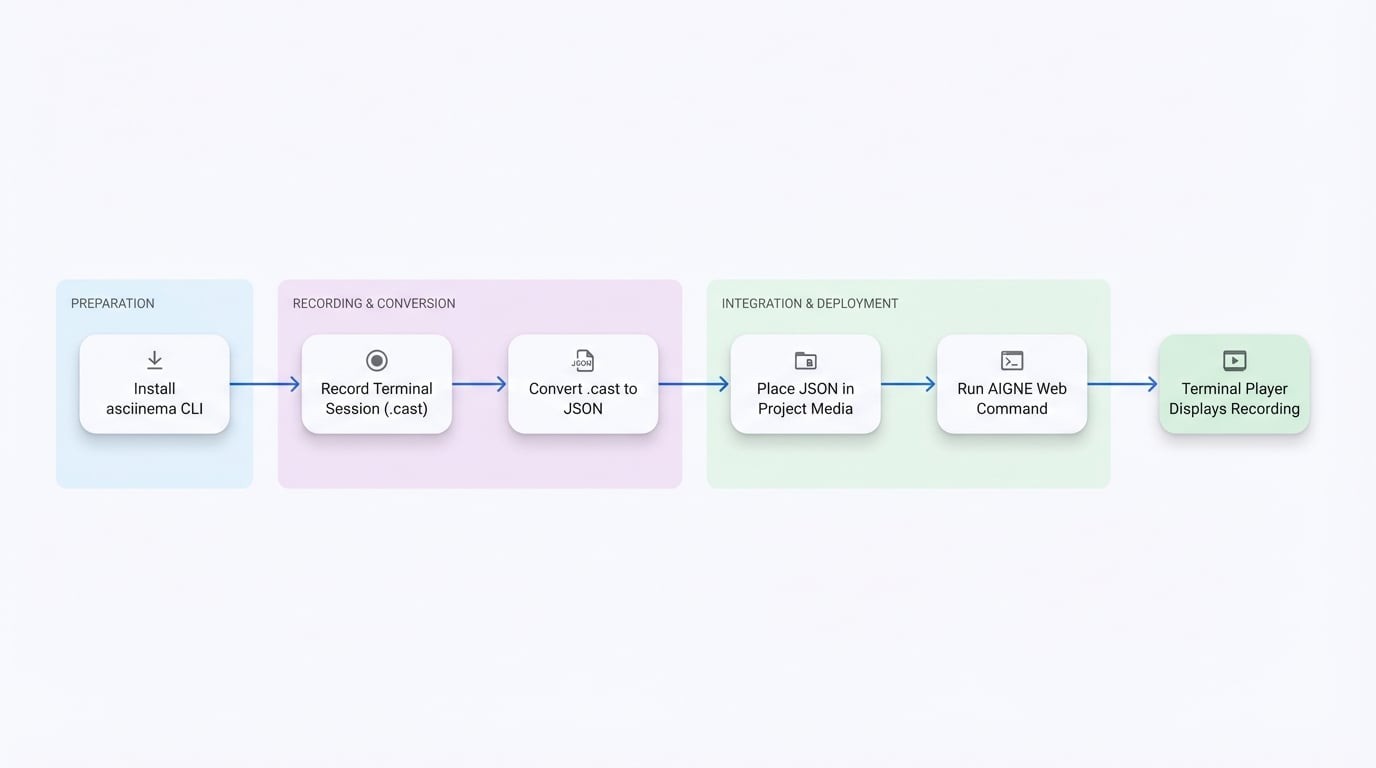
The workflow for using the Terminal Player can be broken down into a sequence of clear, manageable steps. The process begins with the developer recording a terminal session and concludes with the end-user viewing the interactive playback on the website.
The following diagram illustrates this process:
Creating a Terminal Recording#
To use the Terminal Player, you must first create a recording file. The recommended tool for this is asciinema, an open-source command-line utility for recording and sharing terminal sessions.
Step 1: Install the asciinema CLI#
First, install the asciinema tool on your local machine. The installation method varies depending on your operating system.
Installation
# On macOS using Homebrew
brew install asciinema

# On Ubuntu/Debian using APT
sudo apt install asciinema

# Using pipx (cross-platform)
pipx install asciinema
For additional installation options, please refer to the official asciinema documentation.
Step 2: Record Your Session#
Once asciinema is installed, you can begin recording a terminal session by executing the rec command.
Recording Command
# Start a new recording, which will be saved to 'my-demo.cast'
asciinema rec my-demo.cast
After initiating the command, perform all the actions you wish to capture within your terminal. To stop the recording, press Ctrl+D or type the exit command. A file named my-demo.cast will be saved in your current directory. You can verify the playback locally by running asciinema play my-demo.cast.
Important Considerations:
- Plan your steps: The recording captures all actions, including pauses and errors. It is advisable to prepare a script beforehand.
- Terminal Dimensions: The player will replicate the column and row dimensions of the terminal used for recording. Ensure your terminal window is sized appropriately to prevent content wrapping or truncation during playback.
Step 3: Convert the .cast File to JSON#
The Terminal Player component requires the recording data to be in a specific JSON format. An online converter is available to simplify this conversion process.
- Navigate to the Converter: Open the ArcBlock Terminal Player Converter in your web browser.
- Upload Your File: Drag and drop your
.castfile onto the page. - Preview and Download: The tool will generate a live preview of your recording. After confirming it is correct, download the converted
.jsonfile. - Add to Project: Place the downloaded JSON file into your website's media or assets directory.
Using the Recording#
Once the JSON recording file is placed in your project's media or assets directory, it becomes available to the AI. There is no need to manually configure the component in a YAML file.
Simply describe the need for a terminal demonstration in your content source files. When you run aigne web generate or aigne web update, the AI will automatically find the relevant .json recording and use the Terminal Player component to display it on your website.
AIGNE CLI Commands
# To generate the website from scratch
aigne web generate

# To update the website with your changes
aigne web update
For additional information on recording, you may consult the official asciinema website.