The PaymentProvider is the cornerstone of the @blocklet/payment-react library. It functions as a context provider that must wrap your application or the relevant payment-related components. It handles fetching essential settings, managing application state, and providing helper functions and an API client to all its children.
Nearly every component and hook in this library requires being nested within a PaymentProvider to function correctly.
How It Works
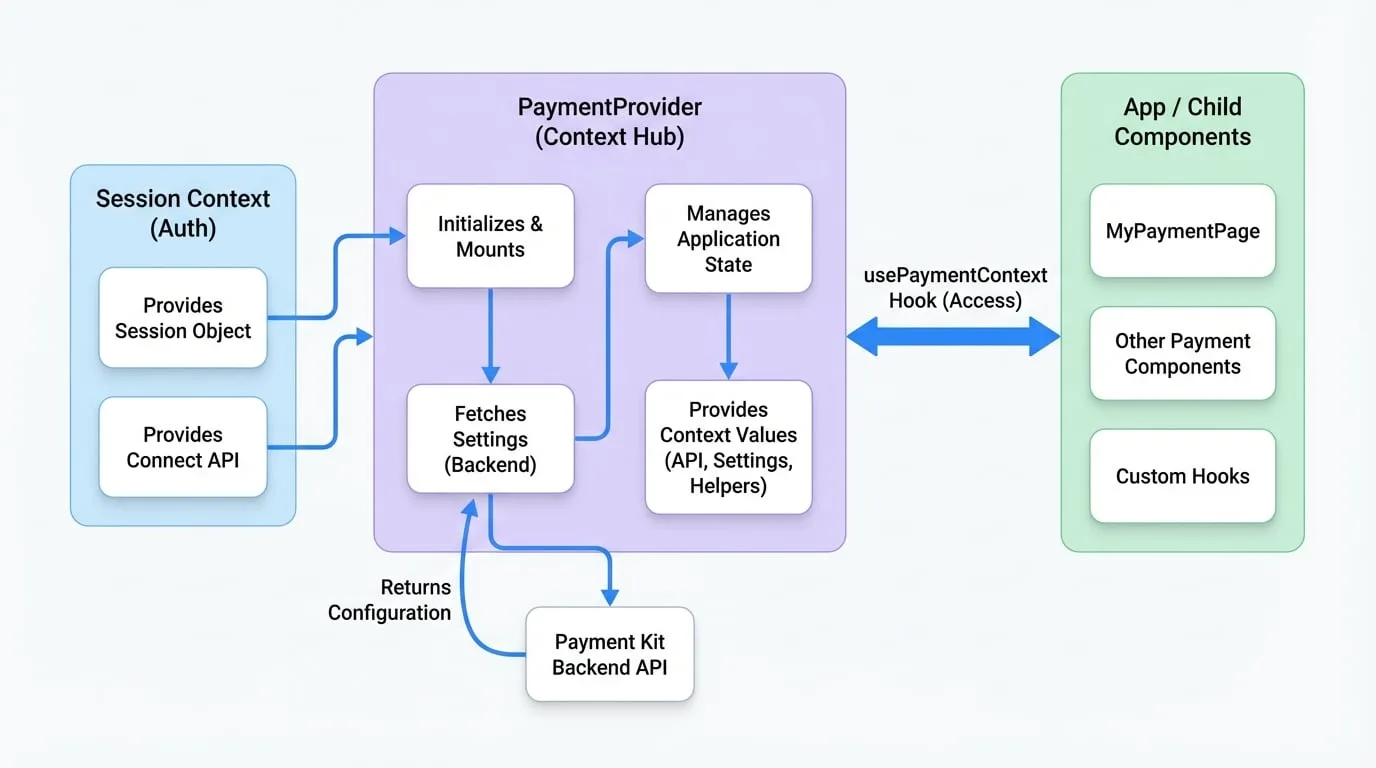
The provider initializes and fetches configuration data from the Payment Kit backend when it mounts. This data, along with the user's session and other utilities, is then made available to any descendant component via the usePaymentContext hook. This pattern ensures that your payment components always have access to the necessary context without prop drilling.
The following diagram illustrates this flow:
Setup and Usage
To use PaymentProvider, you need to supply it with session and connect objects from your application's authentication context. Throughout this documentation, we'll use a custom hook useSessionContext to represent your app's authentication logic. Here is a typical implementation of such a hook:
SessionContext.tsx
import React, { createContext, useContext } from 'react';
import { SessionProvider, useSessionContext as useDidSessionContext } from '@arcblock/did-connect-react';

// You can create your own context or use an existing one
const AppContext = createContext({});

export function AppProvider({ children }) {
  return (
    <SessionProvider>
      <AppContext.Provider value={{}}>
        {children}
      </AppContext.Provider>
    </SessionProvider>
  );
}

// This custom hook provides the session and connectApi to PaymentProvider
export function useSessionContext() {
  const { session, connect } = useDidSessionContext();
  return { session, connectApi: connect };
}
Once you have your session management in place, wrap your main application component with PaymentProvider.
App.tsx
import { PaymentProvider } from '@blocklet/payment-react';
import { useSessionContext } from './SessionContext'; // Your session context hook
import MyPaymentPage from './MyPaymentPage';

function App() {
  const { session, connectApi } = useSessionContext();

  return (
    <PaymentProvider session={session} connect={connectApi}>
      <MyPaymentPage />
    </PaymentProvider>
  );
}

export default App;
Props
The PaymentProvider component accepts the following props:
| Prop | Type | Required | Description |
|---|---|---|---|
session | Session | Yes | The user session object from your authentication context (e.g., @arcblock/did-connect-react). |
connect | Connect | Yes | The connect API function from your authentication context, used for DID Connect operations. |
children | React.ReactNode | Yes | The child components that will have access to the payment context. |
baseUrl | string | No | The base URL of the Payment Kit blocklet. Required only when integrating payment components from a different origin (cross-origin). |
authToken | string | No | A specific authentication token for API requests. If provided, it will be used instead of the session-based authentication. |
Context Values
Components within PaymentProvider can access the following values using the usePaymentContext hook.
MyComponent.tsx
import { usePaymentContext } from '@blocklet/payment-react';

function MyComponent() {
  const { settings, livemode, setLivemode } = usePaymentContext();

  return (
    <div>
      <p>Base Currency: {settings.baseCurrency?.name}</p>
      <p>Mode: {livemode ? 'Live' : 'Test'}</p>
      <button onClick={() => setLivemode(!livemode)}>Toggle Mode</button>
    </div>
  );
}
Here is a complete list of available context values:
| Key | Type | Description |
|---|---|---|
session | object | The authenticated user session, including user details. |
connect | function | The connect function for initiating DID Wallet interactions. |
livemode | boolean | Indicates if the context is in live (true) or test (false) mode. |
setLivemode | (livemode: boolean) => void | A function to toggle between live and test modes. This will trigger a refetch of settings. |
settings | Settings | An object containing paymentMethods and baseCurrency configuration fetched from the backend. |
refresh | (forceRefresh?: boolean) => void | A function to manually trigger a refetch of the settings data. |
getCurrency | (id: string) => TPaymentCurrency | A helper function to retrieve a specific currency's details by its ID. |
getMethod | (id: string) => TPaymentMethodExpanded | A helper function to retrieve a specific payment method's details by its ID. |
api | AxiosInstance | A pre-configured Axios instance for making authenticated API calls to the Payment Kit backend. |
prefix | string | The URL prefix of the blocklet. |
payable | boolean | A state that can be used to control the availability of payment actions. |
setPayable | (status: boolean) => void | A function to update the payable status. |
Advanced Scenarios
Cross-Origin Integration
If your application and the Payment Kit blocklet are hosted on different domains, you must use the baseUrl prop. This allows PaymentProvider to correctly locate and communicate with the Payment Kit API.
CrossOriginApp.tsx
import { PaymentProvider } from '@blocklet/payment-react';
import { useSessionContext } from './SessionContext';

function CrossOriginApp() {
  const { session, connectApi } = useSessionContext();

  return (
    <PaymentProvider
      session={session}
      connect={connectApi}
      baseUrl="https://payment-kit.another-domain.com"
    >
      {/* Your payment components */}
    </PaymentProvider>
  );
}
Custom Authentication Token
In scenarios where you need to use a specific API token instead of the default session-based authentication (e.g., for server-to-server communication or specific access grants), you can pass the authToken prop.
TokenAuthApp.tsx
import { PaymentProvider } from '@blocklet/payment-react';
import { useSessionContext } from './SessionContext';

function TokenAuthApp() {
  const { session, connectApi } = useSessionContext();
  const myCustomAuthToken = 'sk_xxxxxx'; // Your secret token

  return (
    <PaymentProvider
      session={session}
      connect={connectApi}
      authToken={myCustomAuthToken}
    >
      {/* Components will use the provided authToken for API calls */}
    </PaymentProvider>
  );
}
With PaymentProvider set up, you are now ready to start integrating payment components into your application. A good next step is to explore how to create a payment flow using the CheckoutForm component.