Chaining Workflows
DID Connect allows you to link multiple, distinct authentication sessions together, creating a seamless, multi-step process for the user from a single initial interaction. This is ideal for complex scenarios like user registration followed by KYC, or a login followed by a transaction confirmation.
This guide explains the mechanism behind chaining workflows and how to pass data between them.
The Core Mechanism#
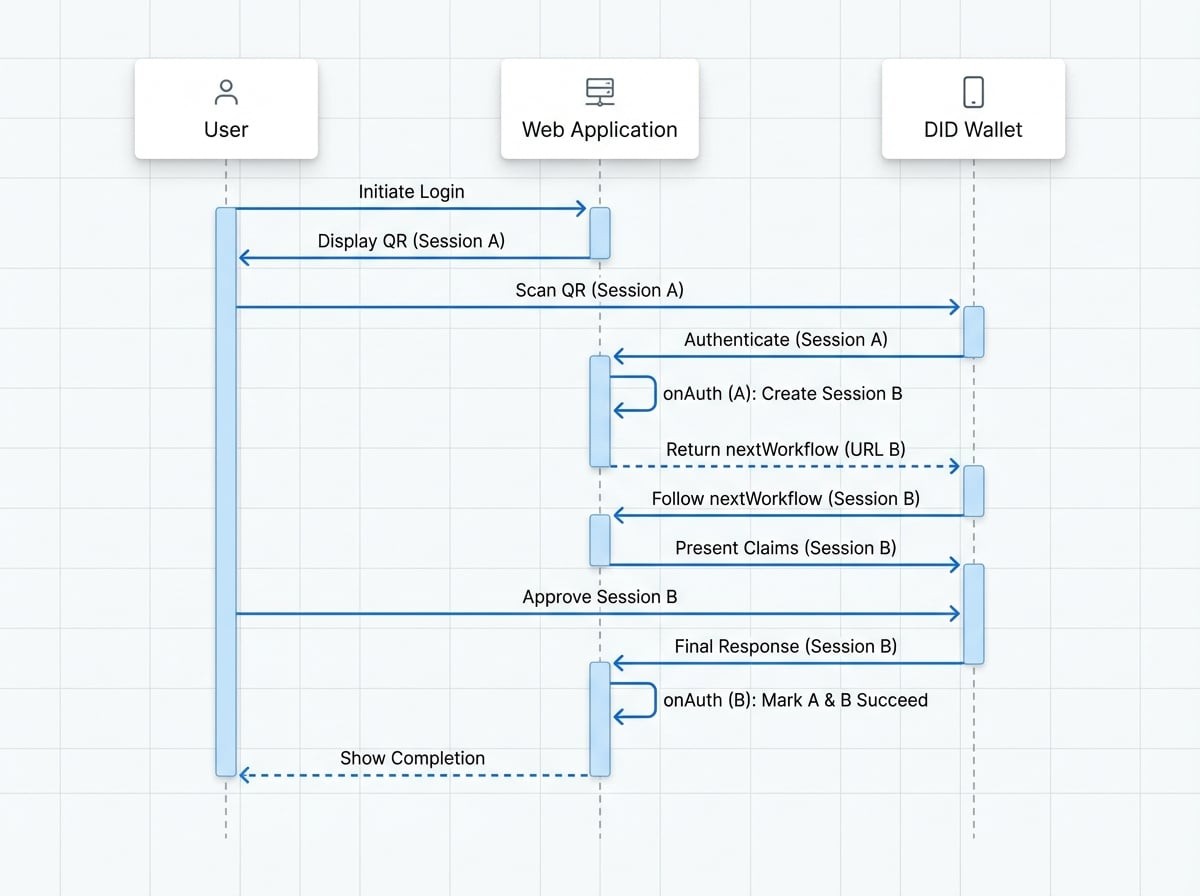
The key to chaining workflows lies in the onAuth lifecycle callback. When a step in a DID Connect session is successfully completed, instead of simply concluding the session, the onAuth handler can initiate a new session and instruct the user's wallet to proceed to it automatically.
This is accomplished by returning two specific properties from the onAuth function:
nextWorkflow: The full deep link URL for the next DID Connect session.nextToken: The session token for the next workflow.
When the wallet receives a response containing nextWorkflow, it immediately opens this URL, starting the next phase of the process without requiring the user to scan a new QR code. The original session remains in a pending state until the entire chain of workflows is completed or declined.
How Session Completion Works#
When you link Session A to Session B:
- Session A's
onAuthreturns thenextWorkflowandnextTokenfor Session B. - Session A is not marked as
succeed. Instead, it records that it has been succeeded by Session B. - When Session B (the final session in the chain) completes successfully, it marks itself as
succeed. - It then looks for a
prevToken(Session A's token) and marks that session assucceedas well, ensuring the entire chain is properly closed.
Passing Data Between Workflows#
Often, you'll need to pass context from one step to the next. For example, passing the user's DID from a login step to a subsequent purchase step. This is achieved using nextWorkflowData and previousWorkflowData.
- Sending Data: In the
onAuthhandler of the first session, return an object callednextWorkflowData. This object will be automatically Base64-encoded and appended to thenextWorkflowURL as apreviousWorkflowDataquery parameter. - Receiving Data: The next session will automatically parse this parameter. The decoded data will be available in the
extraParams.previousWorkflowDataobject inside all lifecycle hooks (onStart,onConnect,onAuth) for that session.
If you chain more than two workflows (A → B → C), the data is merged. When session B returns its own nextWorkflowData, it gets merged with the previousWorkflowData it received from A, and the combined object is passed to C.
Implementation Example#
Let's consider a scenario where a user logs in and then is immediately prompted to sign a welcome message.
Step 1: Define the Login Workflow#
In your onAuth handler for the login session, you'll generate a new session for signing the message and return it as the nextWorkflow.
login-handler.js
// This is a simplified example. In a real app, you would have a separate endpoint to generate tokens.
const { WalletHandlers, WalletAuthenticator } = require('@arcblock/did-connect');
const get = require('lodash/get');

// Assume authenticator and tokenStorage are initialized
const authenticator = new WalletAuthenticator(/* ... */);
const tokenStorage = new MemoryAuthStorage();

const handlers = new WalletHandlers({ authenticator, tokenStorage });

// Handler for the first step: login
handlers.attach({
  app: server,
  action: 'login',
  claims: { profile: { description: 'Please provide your profile' } },
  onAuth: async ({ userDid, claims }) => {
    const profile = claims.find(x => x.type === 'profile');
    console.log(`${userDid} with name ${profile.fullName} logged in.`);

    // Now, create the next workflow for signing a message
    // In a real app, you'd call your own token generation endpoint
    const { data: nextSession } = await axios.get('https://yourapp.com/api/did/sign/token');

    return {
      // The URL and token for the next session
See all 9 lines
Step 2: Define the Signature Workflow#
This workflow will receive the user's name from the login step and use it to customize the signature request.
sign-handler.js
// Handler for the second step: sign a message
handlers.attach({
  app: server,
  action: 'sign',
  claims: {
    signature: ({ extraParams }) => {
      // Access data from the previous workflow
      const fullName = get(extraParams, 'previousWorkflowData.fullName', 'user');
      return {
        type: 'mime:text/plain',
        description: `Hi ${fullName}, please sign this welcome message!`,
        data: `Welcome aboard, ${fullName}!`,
      };
    },
  },
  onAuth: async ({ userDid }) => {
    console.log(`${userDid} signed the welcome message.`);
    // This is the last step, so we don't return a nextWorkflow
    return { successMessage: 'Onboarding complete!' };
  },
});
With this setup, the user scans a single QR code for login, approves it, and is immediately presented with the personalized signature request in their wallet. After signing, the entire multi-step process is complete.
Chaining workflows is a powerful feature for designing sophisticated and user-friendly interactions. You can create complex onboarding flows, multi-party agreements, or any process that requires sequential, authenticated steps.
Next, learn about another advanced feature for more complex application structures. See the Delegated Connect guide.