Handling Wallet Responses
Once you've defined the claims for a DID Connect session as shown in the Requesting Claims guide, the next critical step is to process the user's response from their DID Wallet. The @arcblock/did-connect-js library provides a comprehensive set of lifecycle callbacks to manage every possible outcome of a session, whether the user approves, declines, or the session times out.
These callbacks are passed as functions to the handlers.attach() method and give you specific hooks into the authentication process to run your business logic.
The DID Connect Lifecycle#
A typical DID Connect session follows a clear sequence of events. The diagram below illustrates this flow and indicates when each major lifecycle callback is triggered.
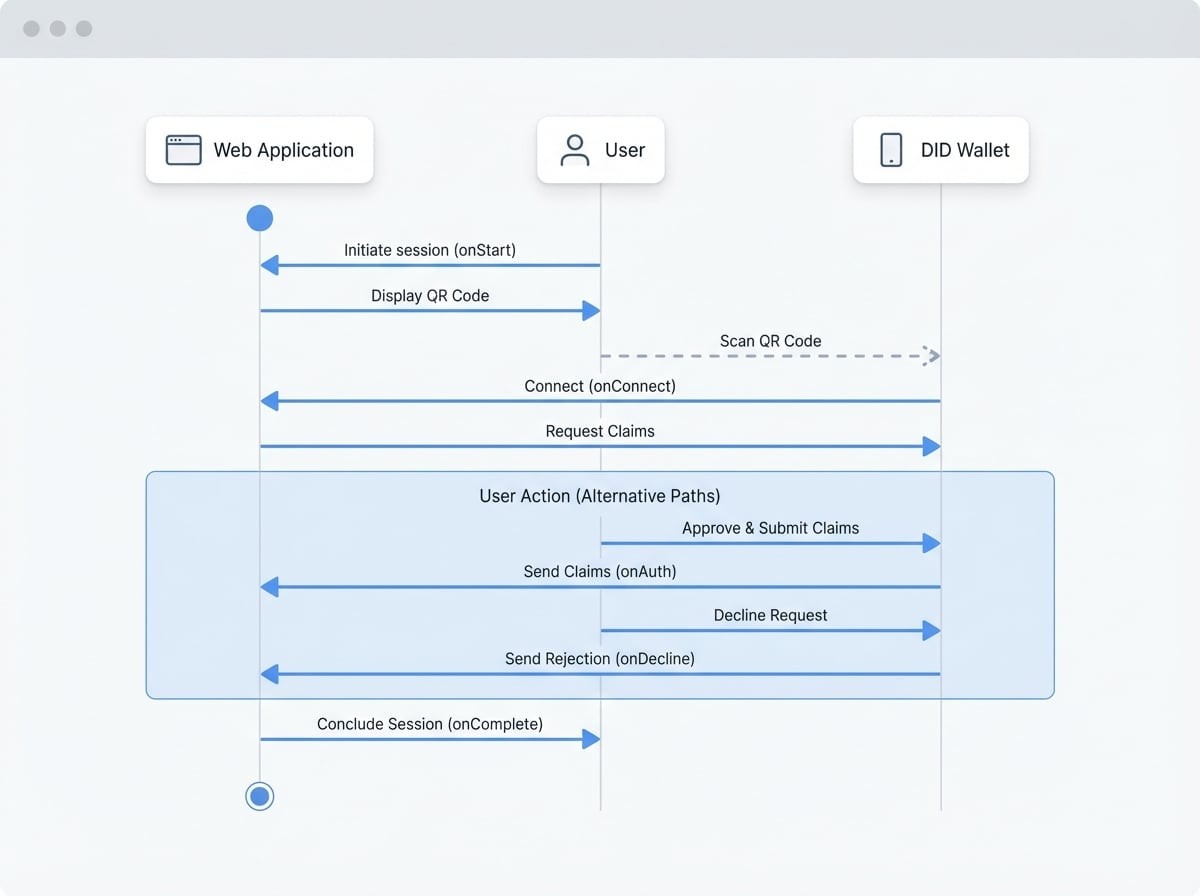
Lifecycle Callbacks#
Here is a detailed breakdown of the available callbacks you can use to handle the entire DID Connect session lifecycle.
Callback | Triggered When... | Common Use Cases |
|---|---|---|
| A new session is initiated and the QR code is ready. | Logging session initiation, preparing session-specific resources. |
| The user's wallet scans the QR code and establishes a connection, but before claims are approved. | Permission checks based on |
| The user explicitly rejects the request in their wallet. | Displaying a cancellation message, logging the rejection. |
| (Required) The user approves the request and submits the requested claims. | Core business logic: validating claims, creating a user session, updating a database. |
| The entire DID Connect session has finished, regardless of success or failure. | Final cleanup tasks, removing temporary session data. |
| The session times out before the user completes the action. | Notifying the user that the QR code has expired, cleaning up stale sessions. |
| An unexpected error occurs during the session. | Error logging and reporting. |
onConnect: Pre-Approval Logic & Dynamic Claims#
The onConnect callback is particularly powerful because it allows you to run logic after you know the user's DID but before they've seen the full list of claims. This is the ideal place to perform permission checks or dynamically generate claims based on the user's identity.
Parameters: { req, challenge, userDid, userPk, extraParams, updateSession }
Example: Generating Dynamic Claims with onConnect
handlers.attach({
  action: 'dynamic-claims',

  // This function can be async
  onConnect: ({ userDid }) => {
    // You can check the user's DID against an allow-list
    if (!isUserAllowed(userDid)) {
      throw new Error('You are not authorized to access this service.');
    }

    // Or return a dynamic set of claims based on user properties
    return {
      profile: () => ({
        fields: ['fullName', 'email'],
        description: 'Please provide your name and email to continue',
      }),
    };
  },

  onAuth: async ({ claims, userDid }) => {
    // `claims` now contains the result for the dynamically generated profile claim
    console.log('Dynamic claim approved by:', userDid, claims);
  },
});
onAuth: Handling Successful Authentication#
The onAuth callback is the heart of your DID Connect integration. It is the only required callback and is executed when the user successfully approves the request in their wallet. It receives the claims data submitted by the user, which you can then use to complete your application's logic, such as logging the user in or verifying ownership of an asset.
Parameters: { req, challenge, claims, userDid, userPk, extraParams, updateSession }
Example: Processing Submitted Claims in onAuth
handlers.attach({
  action: 'profile-login',
  claims: {
    profile: () => ({
      fields: ['fullName', 'email'],
      description: 'Please provide your name and email to log in.',
    }),
  },

  onAuth: async ({ userDid, claims }) => {
    try {
      const profileClaim = claims.find((c) => c.type === 'profile');
      if (profileClaim) {
        console.log(`Login success for ${userDid}`);
        console.log('User Profile:', profileClaim.value);
        // Here you would typically create a user session, save to a database, etc.
        const user = await findOrCreateUser(userDid, profileClaim.value);
      }
    } catch (err) {
      console.error('Error during login process:', err);
    }
  },
});
onDecline: Handling User Cancellation#
If a user decides to cancel the request in their wallet, the onDecline callback is triggered. This allows you to handle the cancellation gracefully, for example, by informing the user on the frontend that the login attempt was canceled.
Parameters: { req, challenge, userDid, userPk, extraParams, updateSession }
Example: Handling a Declined Request
handlers.attach({
  action: 'profile-login',
  claims: { /* ... */ },
  onAuth: async ({ userDid, claims }) => { /* ... */ },

  onDecline: ({ userDid }) => {
    console.log(`User ${userDid} declined the connection request.`);
    // You might update the session to notify the frontend
  },
});
Persisting Data with updateSession#
Several callbacks, including onAuth, onConnect, and onStart, receive an updateSession function as a parameter. This utility is essential for passing information from your backend logic back to the session state, which can then be polled and retrieved by your frontend application.
For example, after a successful login in onAuth, you can generate an application-specific JWT and save it to the session. Your frontend can then retrieve this token to authenticate subsequent API requests.
- To persist plain, non-sensitive info:
await updateSession({ key: 'value' }); - To persist sensitive info (will be encrypted):
await updateSession({ key: 'sensitive-value' }, true);
Example: Using updateSession to Pass a Token to the Frontend
handlers.attach({
  action: 'profile-login',
  claims: { /* ... */ },
  onAuth: async ({ userDid, claims, updateSession }) => {
    const user = await findOrCreateUser(userDid, claims);
    const appToken = generateAppToken(user);

    // Persist a non-sensitive session ID
    await updateSession({ sessionId: 'some-session-id' });

    // Persist a sensitive JWT, which will be encrypted in the session store
    await updateSession({ token: appToken }, true);

    console.log(`Session updated for user ${userDid}`);
  },
});
By effectively using these lifecycle callbacks, you can build robust and user-friendly authentication flows. Now that you understand how to handle responses for a single session, you are ready to explore more complex user journeys.
Next, learn how to create multi-step interactions by linking multiple DID Connect sessions together in the Chaining Workflows guide.