Multi-Step Session
In many real-world applications, a single interaction isn't enough to complete a task. You might need to guide a user through a sequence of steps, such as registering a profile first, then verifying ownership of an asset, and finally signing a user agreement. The DID Connect library facilitates these complex interactions by allowing you to chain multiple sessions together into a single, seamless multi-step workflow.
This example demonstrates how to create a sequential, two-step process where the successful completion of the first step automatically triggers the second.
The Core Mechanism: nextWorkflow#
The key to creating a multi-step session lies in the response from the onAuth callback. By returning a nextWorkflow object, you instruct the user's wallet to immediately start a new DID Connect session using the provided URL.
Here's how it works:
- The user completes the first DID Connect session (e.g., provides a profile).
- Your
onAuthhandler for the first session processes the data and generates a new DID Connect URL for the second session. - The
onAuthhandler returns an object containingnextWorkflow(the new session URL) andnextToken(for your frontend to track the new session). - The DID Wallet receives this response and automatically initiates the next workflow, presenting the user with the request for the second step without requiring them to scan a new QR code.
Example: Profile and Asset Verification#
Let's build a two-step workflow: first, we'll ask for the user's profile, and then we'll ask them to present a specific asset.
Step 1: Requesting the User Profile#
First, we set up an endpoint for the initial step. In the onAuth callback, after successfully receiving the user's profile, we generate a new session for the second step (/api/did/multi-step/step2/token) and return it as the nextWorkflow.
We can also pass data from this step to the next using nextWorkflowData. In this case, we'll pass the user's full name to be used in the description of the second step.
Step 1: Request Profile and Chain to Step 2
const { WalletHandlers, WalletAuthenticator } = require('@arcblock/did-connect-js');
const SimpleStorage = require('@arcblock/did-connect-storage-nedb');
const { fromRandom } = require('@ocap/wallet');
const axios = require('axios');

// Assume authenticator and handlers are already initialized
const wallet = fromRandom();
const authenticator = new WalletAuthenticator({ /* ...config... */ });
const handlers = new WalletHandlers({
  authenticator,
  tokenStorage: new SimpleStorage({ dbPath: '/tmp/multi-step.db' }),
});

// Handler for the first step
handlers.attach({
  app: server, // Your express app instance
  action: 'multi-step/step1',
  claims: {
    profile: () => ({
      fields: ['fullName', 'email'],
      description: 'Step 1: Please provide your profile information.',
    }),
  },
  onAuth: async ({ claims, userDid, req }) => {
    const profile = claims.find((x) => x.type === 'profile');
See all 15 lines
Step 2: Requesting an Asset#
Next, we define the handler for the second step. This handler will receive the data passed from Step 1 via the extraParams.previousWorkflowData object. We can use this data to customize the claim, for example, by personalizing the description.
Step 2: Receive Data and Request Asset
// Handler for the second step
handlers.attach({
  app: server, // Your express app instance
  action: 'multi-step/step2',
  claims: {
    asset: ({ extraParams }) => {
      // Access data from the previous step
      const { fullName } = extraParams.previousWorkflowData;
      return {
        description: `Hi ${fullName}, please present your NFT to complete the process.`,
        trustedIssuers: ['zNKjDm4Xsoaffb19a41w3g9d3AZp2k1YxV4a'], // Example issuer DID
      };
    },
  },
  onAuth: async ({ claims, userDid }) => {
    const asset = claims.find((x) => x.type === 'asset');
    console.log(`Step 2 complete for ${userDid}. Asset presented: ${asset.asset}`);

    // This is the final step, so we return a success message
    return { successMessage: 'You have successfully completed all steps!' };
  },
});
Visualizing the Multi-Step Flow#
The following diagram illustrates the interaction between the user, the application backend, and the DID Wallet during a chained session.
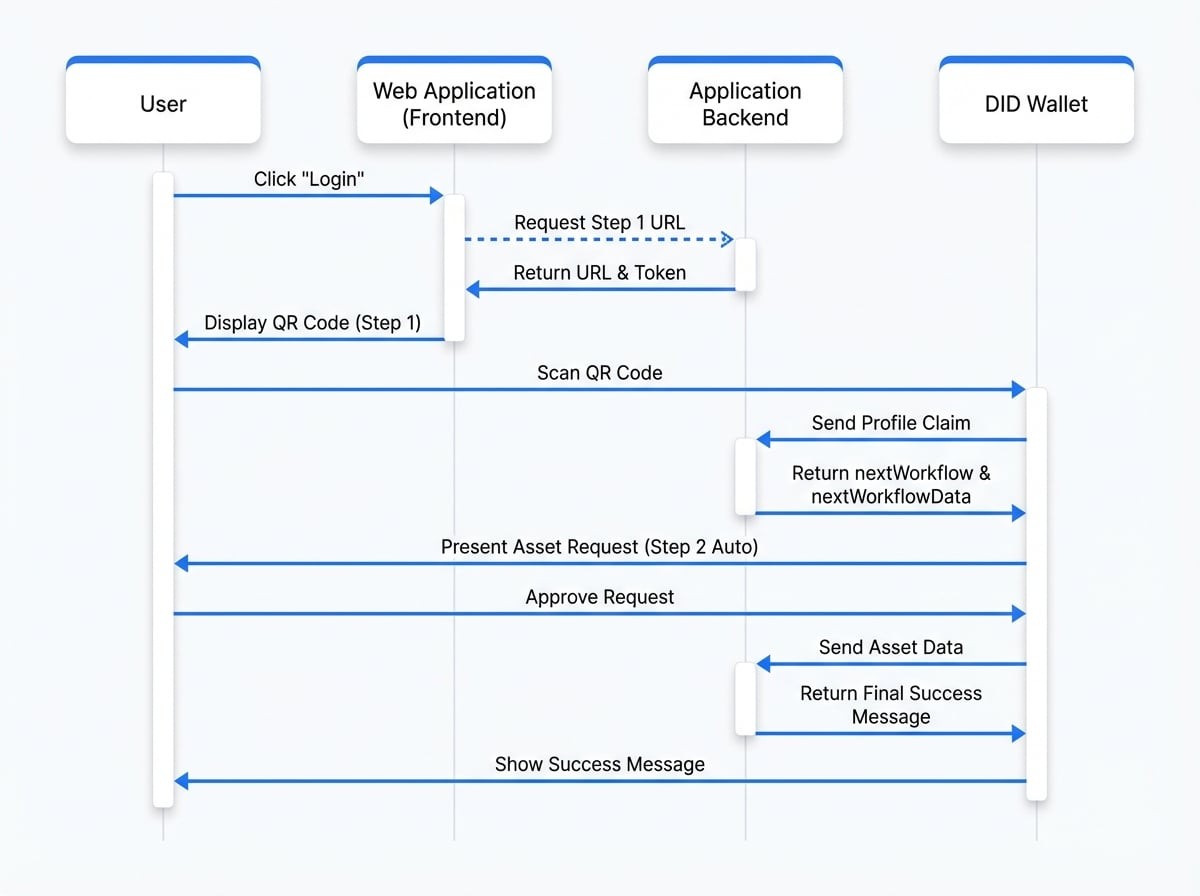
With this pattern, you can build sophisticated, user-friendly workflows that break down complex processes into simple, sequential steps, all without friction for the end-user.
Next Steps#
Now that you understand how to chain workflows, explore other advanced features and examples: