The Model Context Protocol (MCP) Service provides a standardized way for blocklets and their components to expose AI-powered tools and capabilities. It acts as a central gateway, allowing AI agents and other clients to discover and interact with various AI functionalities provided by the installed blocklets in a unified manner.
This guide is for developers who want to build AI-powered features within their blocklets, making them available to MCP clients like Aistro. You will learn how to expose your component's capabilities as "tools," how to list available tools, and how to execute them through the Blocklet Service's MCP endpoints.
Architecture Overview
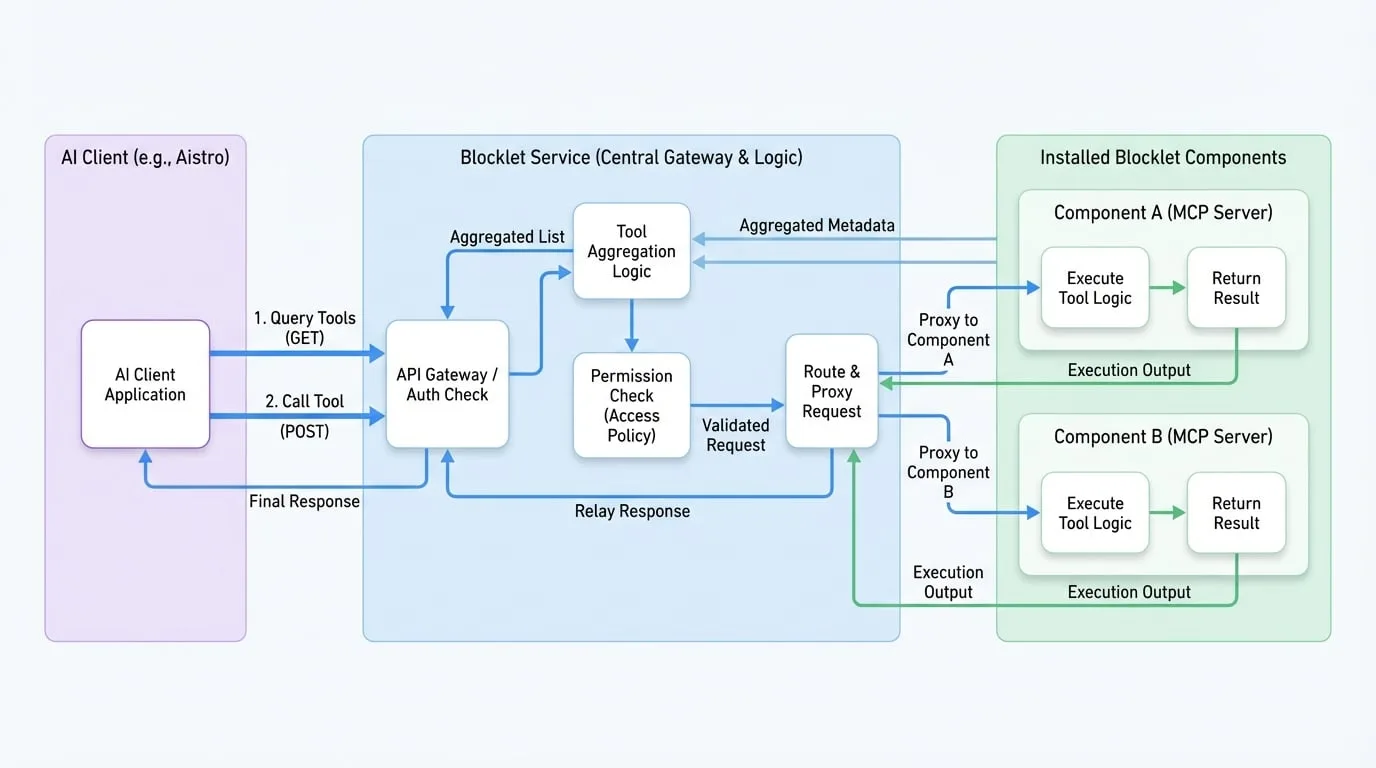
The MCP Service aggregates tools from all installed components that support the protocol. When an external client, such as an AI Chat application, needs to perform a function, it communicates with the central Blocklet Service MCP endpoint. The service then authenticates the request and routes it to the appropriate component to execute the tool. This architecture simplifies client-side implementation, as the client only needs to know about a single endpoint to access a wide range of tools.
The following diagram illustrates this architecture:
How It Works
Discovery
An MCP client can query the Blocklet Service to get a list of all available tools from all installed components.
Routing
When a client calls a specific tool, it sends the request to the Blocklet Service, specifying the
componentDidof the blocklet that provides the tool and thenameof the tool.Execution
The Blocklet Service validates the request and proxies it to the correct component's MCP server.
Response
The component executes the tool's logic and returns the result, which is then relayed back to the client through the Blocklet Service.
Exposing Tools from Your Blocklet
To make your blocklet's tools discoverable by the MCP Service, you must first declare that your component supports the protocol.
1. Enable MCP Capability
In your blocklet's blocklet.yml metadata file, add the mcp: true capability:
name: my-ai-blocklet
version: 1.0.0
capabilities:
  mcp: true
# ... other metadata
This flag signals to the Blocklet Service that your component has an MCP server and its tools should be included in the aggregated list.
2. Implement an MCP Server
Your blocklet component must run its own MCP server and expose an endpoint at the path /mcp. You can use the @modelcontextprotocol/sdk to create a server and define your tools.
A tool is essentially a function with a defined input schema and a description of what it does. The MCP server handles the protocol-level communication, allowing you to focus on the tool's implementation.
Using the MCP Service API
All MCP Service endpoints require user authentication. The client must be logged into the Blocklet Service to make successful requests.
List Available Tools
To discover all tools provided by the installed components, send a GET request to the /mcp/tools endpoint.
Endpoint
GET /.well-known/service/mcp/tools
Example Request
Here is an example of how to fetch the list of available tools using JavaScript's fetch API.
Fetching Tools
async function listAllTools() {
  try {
    const response = await fetch('/.well-known/service/mcp/tools', {
      method: 'GET',
      headers: {
        'Accept': 'application/json',
      },
    });

    if (!response.ok) {
      throw new Error(`HTTP error! status: ${response.status}`);
    }

    const tools = await response.json();
    console.log('Available Tools:', tools);
    return tools;
  } catch (error) {
    console.error('Failed to fetch tools:', error);
  }
}

listAllTools();
Example Response
The endpoint returns a JSON array of tool objects. Each object describes a tool's name, purpose, input schema, and the component that provides it.
Example Tool List Response
[
  {
    "name": "sendNotification",
    "description": "Sends a notification to a user's wallet.",
    "arguments": {
      "type": "object",
      "properties": {
        "userDid": {
          "type": "string",
          "description": "The DID of the user to notify."
        },
        "message": {
          "type": "string",
          "description": "The content of the notification."
        }
      },
      "required": ["userDid", "message"]
    },
    "appPid": "z2qa...",
    "componentDid": "z8iZ..."
  },
  {
    "name": "createImage",
    "description": "Generates an image based on a text prompt.",
    "arguments": {
      "type": "object",
      "properties": {
        "prompt": {
          "type": "string",
          "description": "A text description of the desired image."
        }
      },
      "required": ["prompt"]
    },
    "appPid": "z2qa...",
    "componentDid": "z8iK..."
  }
]
Call a Tool
To execute a specific tool, send a POST request to the /mcp/tools endpoint with the tool's details in the request body.
Endpoint
POST /.well-known/service/mcp/tools
Request Body
The request body must be a JSON object containing the name of the tool, the DID of the component providing it, and the input arguments.
- name
string(required) — The name of the tool to be executed. - componentDid
string(required) — The DID of the component that exposes the tool. - input
any(required) — The arguments for the tool, matching the schema defined by the tool.
Example Request
This example demonstrates how to call the sendNotification tool.
Calling a Tool
async function callMcpTool() {
  const toolPayload = {
    name: 'sendNotification',
    componentDid: 'z8iZ...', // Replace with the actual component DID
    input: {
      userDid: 'z1...', // Replace with the recipient's DID
      message: 'Hello from MCP Service!'
    }
  };

  try {
    const response = await fetch('/.well-known/service/mcp/tools', {
      method: 'POST',
      headers: {
        'Content-Type': 'application/json',
      },
      body: JSON.stringify(toolPayload),
    });

    if (!response.ok) {
      throw new Error(`HTTP error! status: ${response.status}`);
    }

    const result = await response.json();
    console.log('Tool execution result:', result);
    return result;
  } catch (error) {
    console.error('Failed to call tool:', error);
  }
}

callMcpTool();
Example Response
The response will contain the output from the tool execution. The structure of the response depends on the tool's implementation.
Example Tool Call Response
{
  "status": "success",
  "notificationId": "nt_12345"
}
Security and Permissions
When you implement an MCP tool, you can define an access policy to control who can execute it. The permission check is handled by the Blocklet Service, ensuring that only authorized users can access your tools.
The access policy can include allow and deny rules based on the user's DID, role (e.g., owner, admin, member), or authentication provider.
Access Policy Structure
- allow
object— Rules to permit access. Ifallowis defined, a user must match at least one rule to be granted access.- dids
string[]— A list of user DIDs that are allowed. - roles
string[]— A list of roles that are allowed (e.g., 'owner', 'admin'). - providers
string[]— A list of authentication providers that are allowed.
- dids
- deny
object— Rules to deny access. If a user matches anydenyrule, access is denied, even if they match anallowrule.- dids
string[]— A list of user DIDs that are denied. - roles
string[]— A list of roles that are denied. - providers
string[]— A list of authentication providers that are denied.
- dids
Example: Role-Based Access
For example, to restrict a tool to only be callable by blocklet owners and administrators, you would define the following policy:
Access Policy Example
const policy = {
  allow: {
    roles: ['owner', 'admin'],
  },
};
This policy ensures that any attempt to call the tool by users with other roles (or unauthenticated users) will be rejected with an "Unauthorized" error.
Summary
The MCP Service provides a powerful framework for extending your blocklet's functionality with AI-driven tools. By exposing your features through the Model Context Protocol, you enable seamless integration with AI agents and other applications, creating a more intelligent and interconnected ecosystem. Remember to secure your tools with appropriate access policies to ensure they are used safely and correctly.
For more information on user authentication, please refer to the Authentication Service documentation.