The prepareTx claim is a powerful tool for dApps that need users to complete and sign transactions, especially in payment and asset transfer scenarios. Unlike a standard signature claim where the entire transaction is pre-defined, prepareTx sends a partially constructed transaction to the wallet. The wallet is then responsible for adding the necessary inputs (like tokens or assets) to meet a specified requirement, signing the completed transaction, and returning it to the dApp.
This is particularly useful when the dApp knows what needs to be paid but doesn't know which specific assets the user will pay with. The user can select the required inputs directly from their wallet, providing a flexible and secure user experience.
See the Signature Claim for simpler signing requests where the transaction is fully formed by the dApp.
How It Works
The workflow for a prepareTx claim involves the application defining the core logic of a transaction while leaving the funding part to the user's wallet.
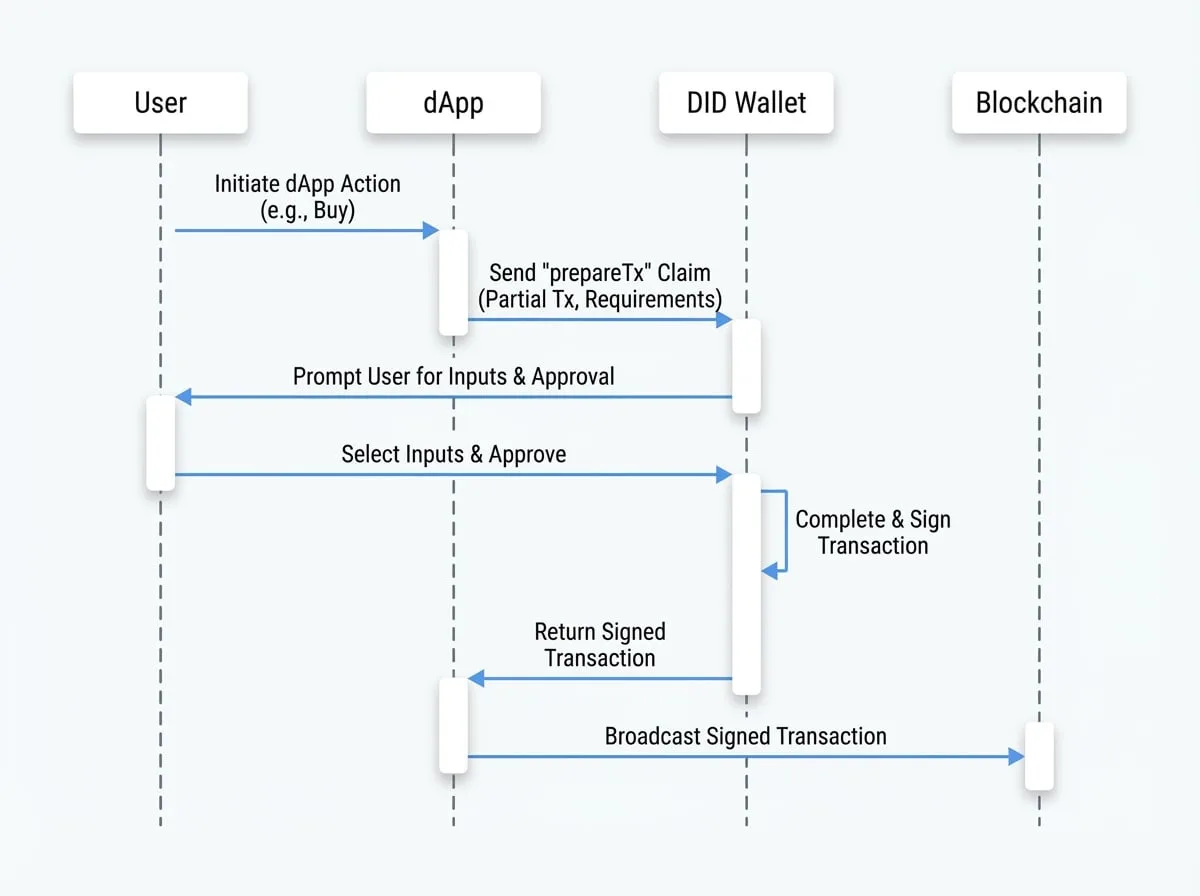
Initiation
The user performs an action in the dApp that requires a transaction, like making a purchase.
Claim Generation
The dApp constructs a partial transaction (e.g., a transfer to its own address) and a
requirementobject detailing what the user needs to contribute (e.g., 100 native tokens).Wallet Interaction
The wallet receives the claim, presents the transaction details to the user, and provides an interface for them to select the tokens or assets needed to satisfy the
requirement.Completion & Signing
Once the user approves and selects their assets, the wallet completes the transaction with the chosen inputs and signs it with the user's private key.
Return to dApp
The wallet returns the fully signed, ready-to-broadcast transaction to the dApp.
Broadcast
The dApp receives the signed transaction and can then submit it to the blockchain for processing.
Parameters
The prepareTx claim object is configured with the following properties:
| Parameter | Type | Description |
|---|---|---|
description | string | A user-friendly message explaining the purpose of the transaction. Defaults to 'Prepare and sign this transaction to continue.'. |
partialTx | string or object | Required. The partially constructed transaction. This can be a raw transaction object or a pre-encoded, Base58-encoded string. |
requirement | object | Required. An object specifying the resources the wallet must add to the transaction. |
display | string | Optional. A JSON string containing { type, content } to provide a richer UI display in the wallet. |
chainInfo | object | The blockchain information where the transaction will be executed. Can be provided here or globally in the WalletAuthenticator config. |
meta | any | Optional. Any extra metadata you want to associate with the claim. Defaults to {}. |
mfa | boolean | Optional. If set to true, the wallet will be prompted to perform multi-factor authentication. |
nonce | string | Optional. A nonce to be included in the transaction if required by the protocol. |
Requirement Object
The requirement object is crucial for defining what the user needs to contribute.
| Field | Type | Description |
|---|---|---|
tokens | Array<object> | Required. An array of token requirements. Each object must contain address (the token's DID) and value (the amount required as a string or BN.js instance). |
assets | object | Optional. An object specifying NFT requirements. You can filter assets by address, parent, issuer, or specify an amount of assets to be included. |
Example
Here is an example of how to request a prepareTx claim. The dApp wants to receive 100 units of a specific token. It creates a partial transaction and defines the requirement for the wallet.
DID Connect Handler
const claims = {
  // Using a raw transaction object that the SDK will encode
  prepareTx_raw: [
    'prepareTx',
    ({ userDid, userPk }) => ({
      type: 'TransferV2Tx', // The transaction type for the SDK to encode
      description: 'Complete this payment to purchase the item.',
      display: JSON.stringify({ type: 'text', content: 'Purchase confirmation for Item #123' }),
      partialTx: {
        itx: {
          to: 'z2qa5b3g7492c3697a4e69b9a6b986b59e4d5',
        },
      },
      requirement: {
        tokens: [
          {
            address: 'z35nB2SA6xxBuoaiuUXUw6Gah2SNU3UzqdgEt', // Token Address
            value: '100',
          },
        ],
      },
    }),
  ],

  // Using a pre-encoded partial transaction
  prepareTx_encoded: async ({ userDid, userPk }) => {
    // This encoding step would typically happen on your backend
    const client = new Client('https://beta.abtnetwork.io/api');
    const encoded = await client.encodeTransferV2Tx({
      tx: {
        itx: {
          to: 'z2qa5b3g7492c3697a4e69b9a6b986b59e4d5',
        },
      },
      wallet: fromRandom(), // A placeholder wallet for encoding
    });

    return {
      type: 'prepareTx',
      description: 'Complete this payment to purchase the item.',
      partialTx: toBase58(encoded.buffer), // The pre-encoded buffer as a Base58 string
      requirement: {
        tokens: [
          {
            address: 'z35nB2SA6xxBuoaiuUXUw6Gah2SNU3UzqdgEt',
            value: '100',
          },
        ],
      },
    };
  },
};
In both cases, the wallet will receive the partial transaction and the requirement. It will then prompt the user to select 100 units of the token with address z35nB2SA6xxBuoaiuUXUw6Gah2SNU3UzqdgEt from their holdings, add them as inputs to the transaction, sign it, and return the result.
Next Steps
After mastering the prepareTx claim, you might be interested in other related functionalities.