A DID Connect session is a secure, decentralized authentication process that allows a user to interact with a decentralized application (DApp) using their DID Wallet. This guide breaks down the end-to-end process, from the initial QR code scan to the final handling of the user's response.
The typical workflow involves four main actors:
User
The individual interacting with the application.
Browser (DApp Frontend)
The user interface of your application running in the user's browser.
DApp Backend
Your server-side application where the
@arcblock/did-connect-jslibrary is integrated.DID Wallet
The user's mobile or web-based wallet that manages their decentralized identity (DID) and private keys.
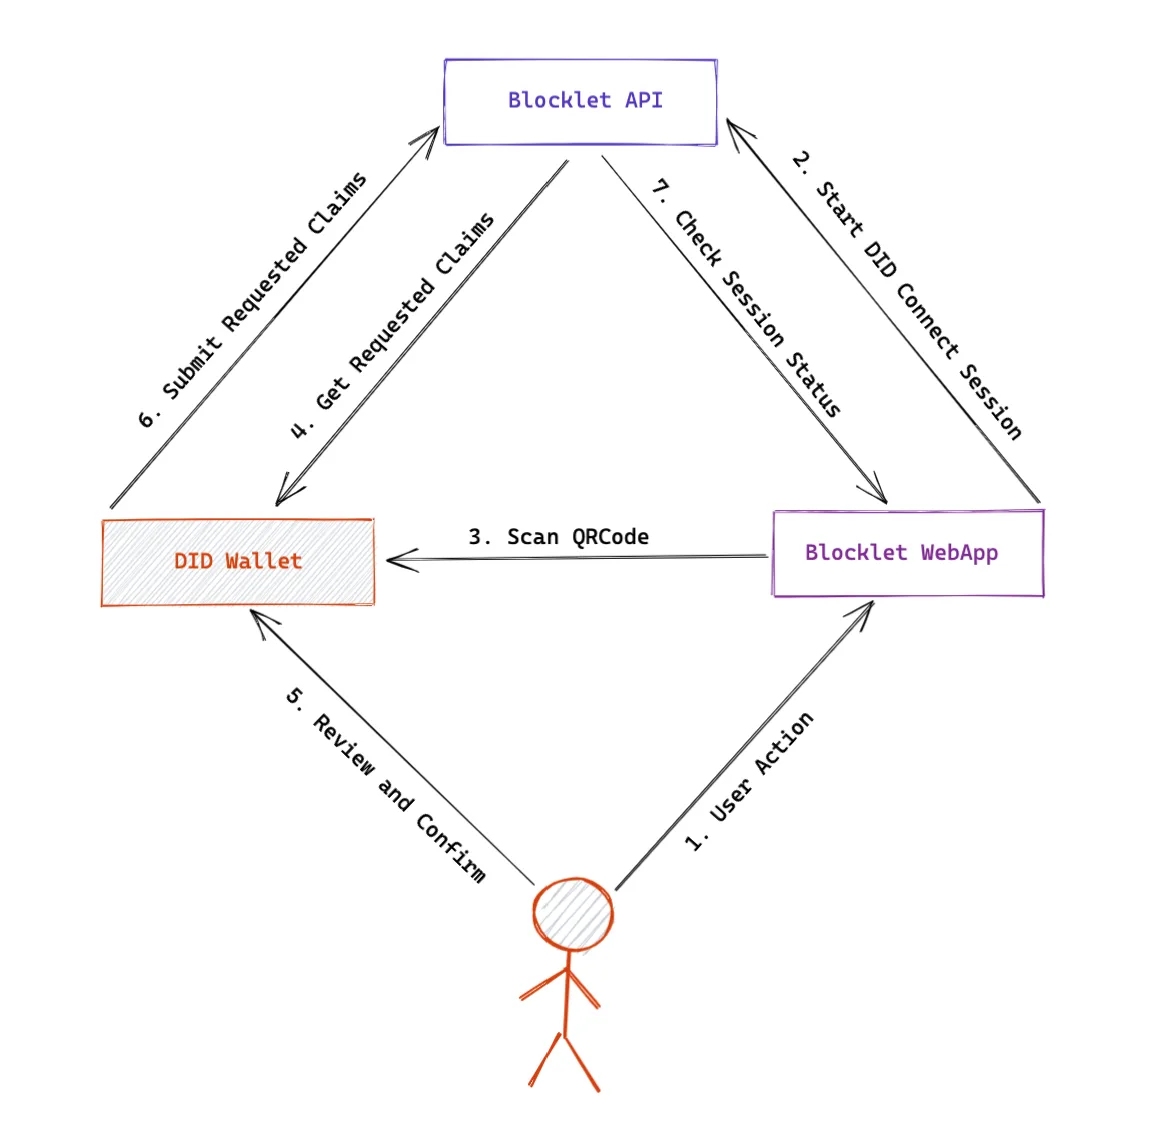
Visual Overview
The following diagram illustrates the high-level interaction between the DApp and the DID Wallet during a typical authentication session.
Step-by-Step Breakdown
Let's dive into the technical details of each step in the process. The sequence diagram below shows the complete communication flow.
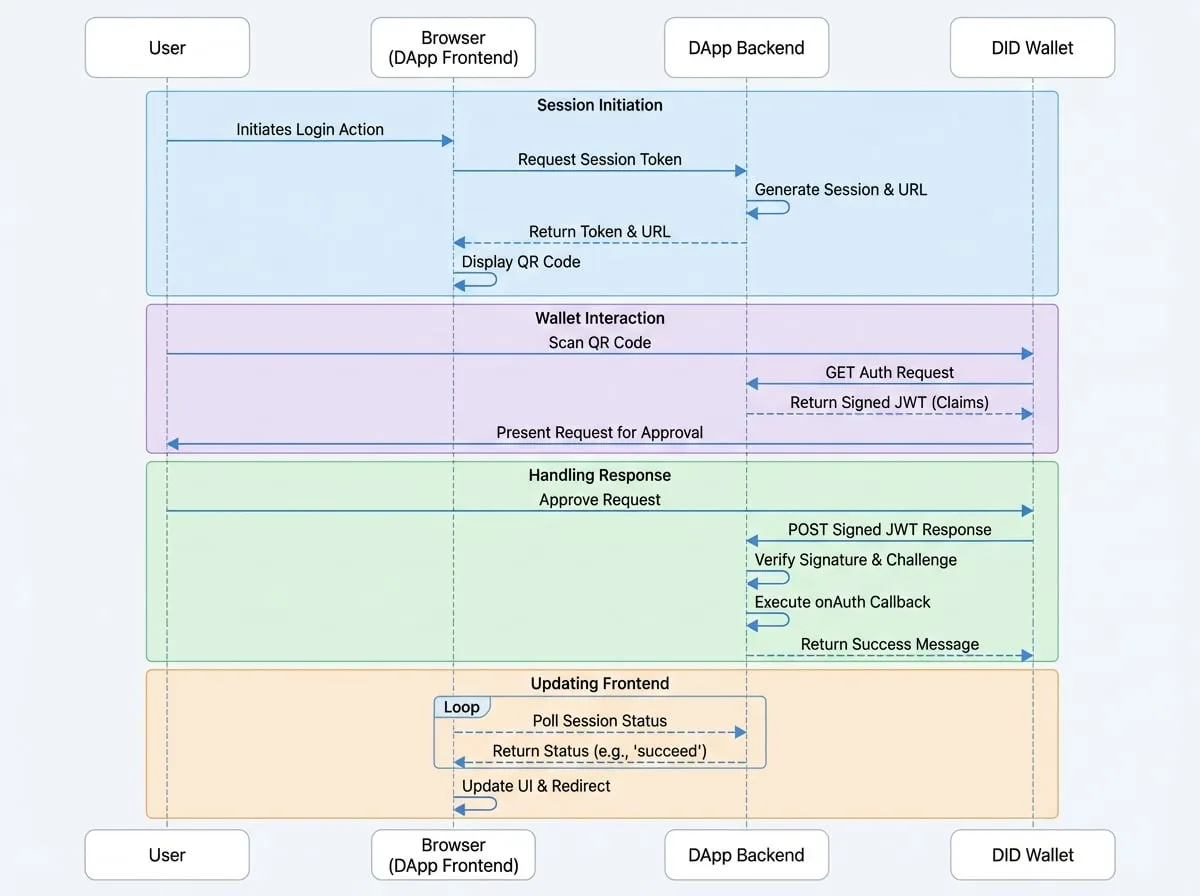
1. Session Initiation: Generating the QR Code
The process begins when the user wants to log in or perform a protected action.
- Frontend Request: The DApp's frontend makes a request to a dedicated endpoint on its backend (e.g.,
GET /api/did/login/token). - Backend Handler: The
did-connect-jshandler (generateSession) on your backend creates a new, unique session. It generates:
- A unique
tokento identify the session. - A cryptographic
challengeto prevent replay attacks. - A full DID Connect URL (e.g.,
https://didconnect.io/i/?url=...) containing this information.
- Frontend Display: The backend returns the
tokenand theurlto the frontend. The frontend then renders theurlas a QR code for the user to scan.
2. Wallet Interaction: Scanning and Approval
Scan
The user scans the QR code with their DID Wallet.
Request Claims
The wallet makes a
GETrequest to the auth URL from the QR code. This hits theonAuthRequesthandler on your backend.Backend Response
Your backend updates the session status to
scannedand sends back a signed JSON Web Token (JWT). This JWT contains the information your application is requesting from the user, known as claims (e.g.,authPrincipalto request a connection, orprofileto request user data).User Approval
The wallet verifies the JWT and presents the request to the user. The user can then choose to approve or decline the request.
3. Handling the Response
- Wallet Submission: If the user approves, the wallet creates and signs its own JWT containing the requested information. It then
POSTs this JWT back to the same auth URL. - Backend Verification: This request is handled by the
onAuthResponsefunction in your backend. The library automatically verifies the wallet's signature and the challenge. This is the most critical step for security. - Execute Business Logic: If the verification is successful, the library triggers your
onAuthcallback. This is where you put your core business logic, such as:
- Finding or creating a user account based on their
userDid. - Processing the
claimsdata (e.g., saving the user's profile). - Generating a web session token for the browser.
- Using
updateSessionto store data that the frontend can later retrieve.
- Session Completion: The backend marks the session status as
succeed.
4. Updating the Frontend
While the user is interacting with their wallet, your DApp's frontend polls a status endpoint (e.g., GET /api/did/login/status?_t_={token}). Once it sees the status change to succeed, it knows the process is complete. It can then fetch any necessary data (like a login token) from the session and update the UI accordingly, for example, by redirecting the user to their dashboard.
This entire flow provides a secure, passwordless authentication experience that puts the user in control of their data.
For a deeper understanding of how to manage the data received from the wallet, proceed to our guide on Handling Wallet Responses.