Service Provider Mode
Ready to offer your own multi-tenant AI service? This guide details how to activate Service Provider Mode in AIGNE Hub. You will learn to enable the credit-based billing system, integrate the Payment Kit, and define custom pricing to create a monetized AI gateway for your users.
Service Provider Mode transforms AIGNE Hub from an internal tool into a full-featured, customer-facing platform. It builds upon the core features by adding a comprehensive billing and monetization layer, allowing you to resell access to a wide range of AI models. This is ideal for SaaS platforms, agencies, and developers looking to offer AI capabilities as a service.
For information on deploying AIGNE Hub for internal use, see the Enterprise Self-Hosting documentation.
How It Works#
When Service Provider Mode is enabled, AIGNE Hub operates on a prepaid, credit-based system. The following diagram illustrates the workflow:
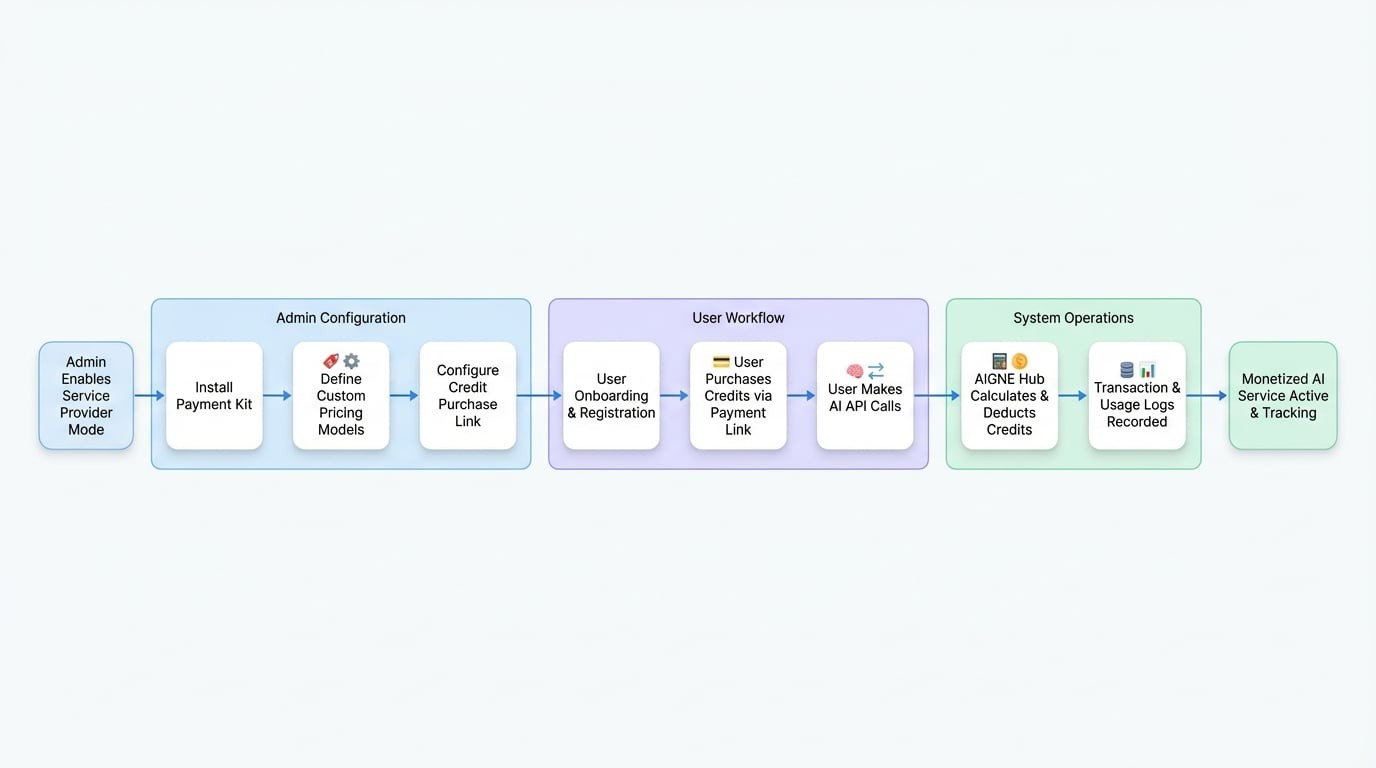
The workflow is as follows:
- User Onboarding: New users are automatically registered within the system. You can configure starter credits to allow them to test the service immediately.
- Credit Purchase: Users purchase credits through a payment link. This process is managed by the Payment Kit, a companion Blocklet that handles checkout sessions and payment processing.
- AI Model Usage: Users make API calls to AIGNE Hub to interact with various AI models.
- Credit Deduction: For each API call, AIGNE Hub calculates the cost based on your custom-defined model rates and deducts the corresponding amount from the user's credit balance.
- Usage Tracking: All transactions are recorded, providing both the administrator and the user with detailed analytics on consumption and spending.
This model provides a flexible and scalable way to manage a multi-tenant AI service, ensuring that usage is billed accurately and automatically.

Configuration Steps#
Enabling the credit-based billing system involves installing the Payment Kit and configuring your pricing models.
1. Install the Payment Kit#
The Payment Kit is a separate Blocklet that integrates with AIGNE Hub to handle all payment-related functionalities, including customer management, credit purchasing, and checkout processes.
To install it:
- Navigate to the Blocklet Store in your Blocklet Server admin interface.
- Search for "Payment Kit".
- Click "Launch" and follow the installation wizard to deploy it.
Once the Payment Kit is running, AIGNE Hub will automatically detect it and enable the necessary billing features.
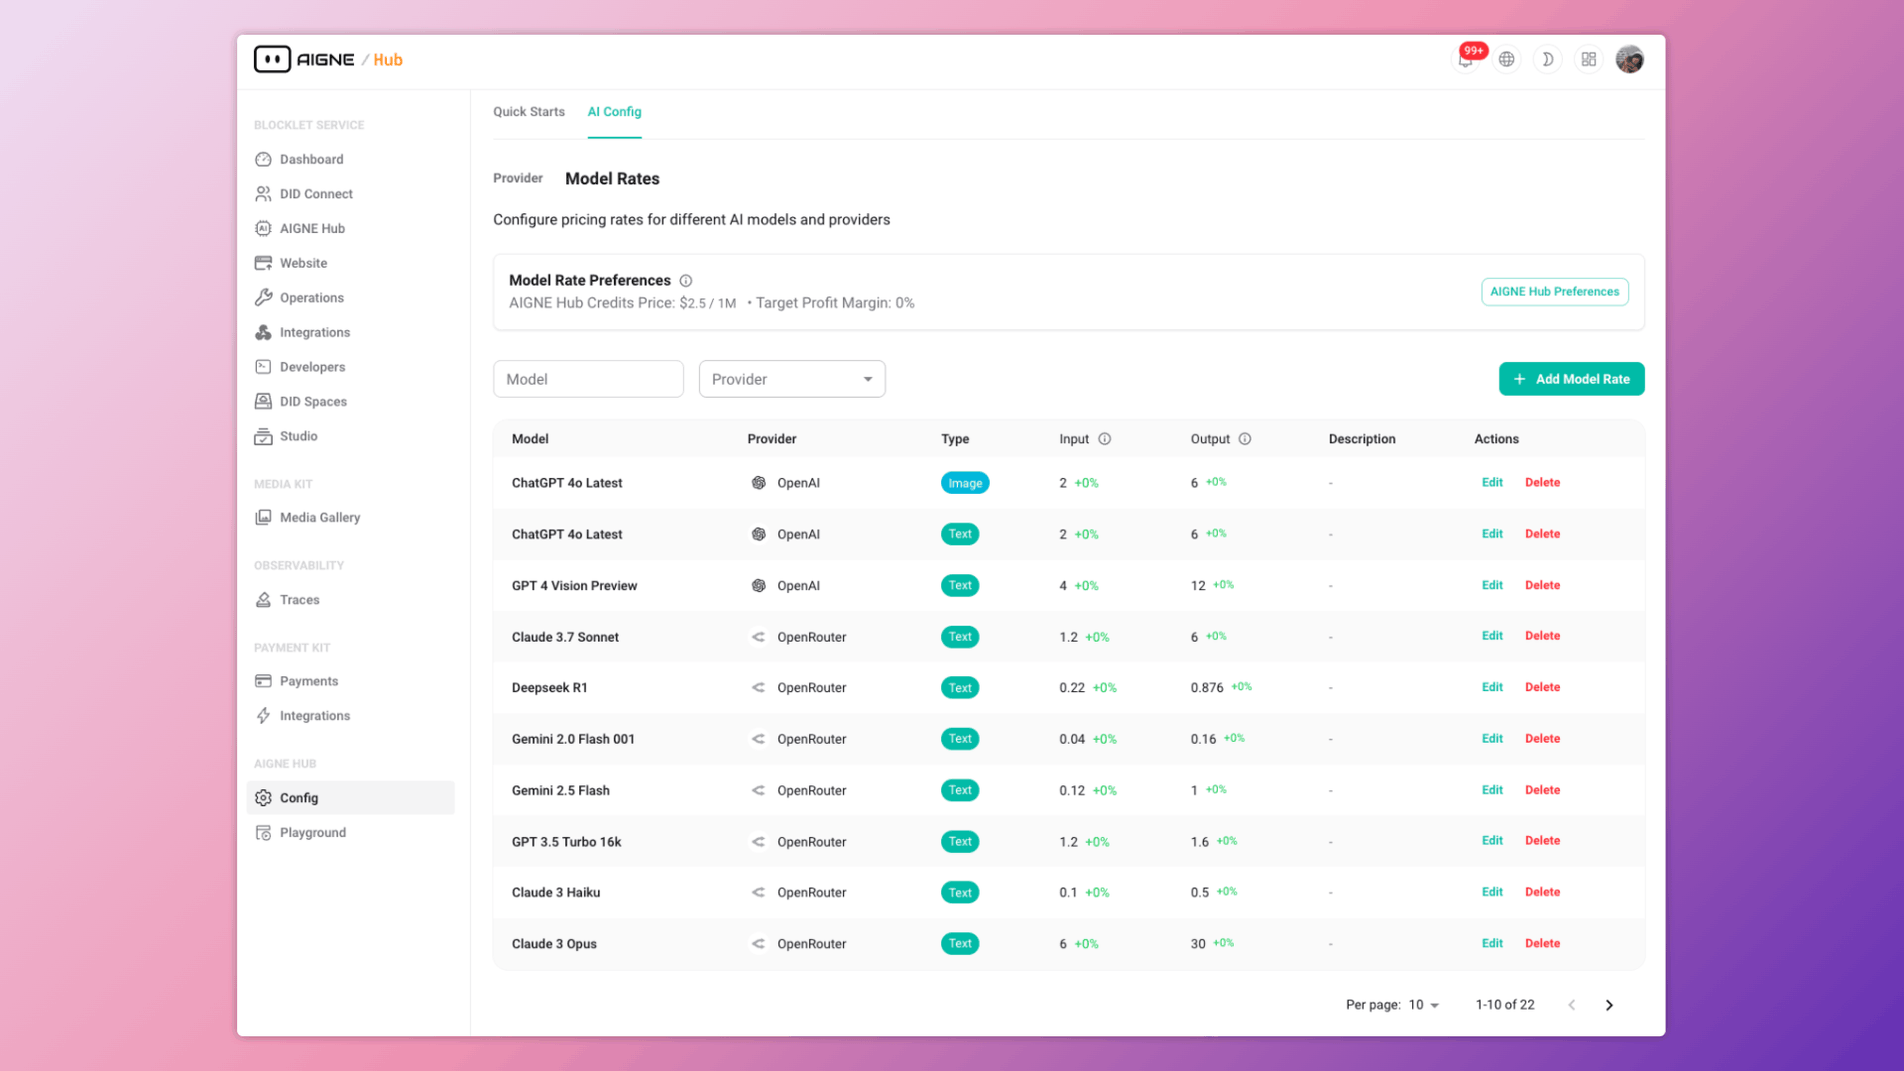
2. Define Custom Pricing Models#
After enabling the billing system, you must define the rates at which user consumption will be charged. This allows you to set your own pricing, which can include a margin on top of the costs from the upstream AI providers.
- In the AIGNE Hub admin dashboard, navigate to Config > Model Rates.
- Click "Add Model Rate" to open the configuration modal.
- Define the pricing for a specific model by filling in the required fields:
- Model Name: The identifier for the model (e.g.,
gpt-4o). - Rate Type: The type of content the model handles (e.g., Text, Image).
- Providers: The upstream AI provider for this model.
- Model Cost: The actual cost you pay to the provider.
- AIGNE Hub Credit Rate: The price in credits you will charge your users.
- Description: An optional description for the model rate.
- Model Name: The identifier for the model (e.g.,
By setting a higher credit rate than your actual cost, you can generate a profit margin on each transaction. You can create multiple pricing tiers for the same model or different rates for various customer groups if needed.
3. Configure the Credit Purchase Link#
To allow users to buy credits, you need to set up a payment link. The Payment Kit can automatically generate a default link, or you can create a custom one.
- A default payment link is created automatically when the Payment Kit is installed. You can find and manage it within the Payment Kit's interface.
- In the AIGNE Hub admin dashboard, go to Billing & Credits > Settings.
- Enter the URL for your credit purchase page in the Credit Payment Link field. This link will be provided to users when their balance is low.
This setup ensures a seamless experience for users to recharge their credit balance and continue using the service without interruption.
Managing User Credits#
As an administrator, you have full control over user credit balances and can view detailed transaction histories.
Viewing User Balances#
To see a user's current credit balance, pending deductions, and total credits purchased:
- Navigate to the Users section in the AIGNE Hub admin dashboard.
- Select a user from the list to view their details.
- The user's credit information will be displayed, providing a complete overview of their account status.
Reviewing Transactions#
AIGNE Hub logs every transaction that consumes credits. This includes API calls for chat completions, image generation, and other AI tasks.
- Credit Grants: Records of all credits added to a user's account, either through purchase or manual grants.
- Credit Transactions: A detailed log of all deductions, showing which AI model was used, the amount consumed, and the timestamp of the event.
You can access these logs through the Billing & Credits section, allowing for transparent auditing and easy resolution of any billing inquiries.
Summary#
By enabling Service Provider Mode, you can leverage AIGNE Hub's powerful multi-provider gateway to build and scale your own monetized AI service. The integration with the Payment Kit provides a robust, automated system for managing credit-based billing, custom pricing, and user consumption.
For a deeper dive into monitoring consumption, refer to the Usage & Cost Analytics guide. To understand how to manage upstream providers, see Provider Management.