The Blocklet Service provides a robust, multi-channel Notification Service designed to streamline communication with your users. Instead of building and maintaining separate integrations for different delivery methods, you can use a single, unified API to send notifications through various channels, including DID Wallet messages, emails, and push notifications via PushKit.
This service is built for reliability, using a queuing system to process notifications asynchronously. This ensures that delivery attempts are retried in case of transient failures and that the system remains responsive under load.
Overview
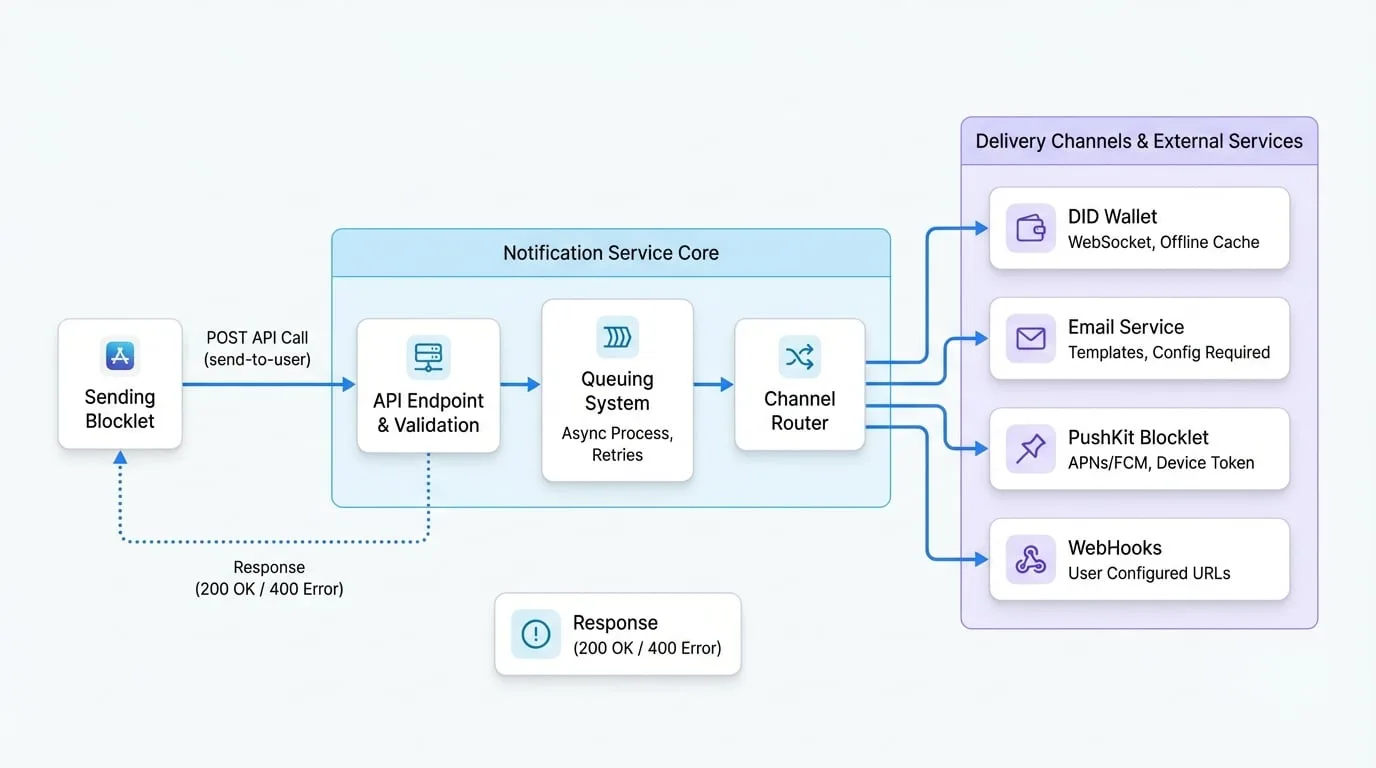
The notification process is initiated when your blocklet makes a secure API call to the Notification Service. The service then validates the request and queues a job to deliver the message to the specified users across the selected channels. The following diagram illustrates the high-level architecture:
API Usage
Send Notification
This is the primary endpoint for sending a notification to one or more users. It accepts a detailed payload specifying the sender, receivers, content, and desired delivery channels.
Endpoint
POST /.well-known/service/api/send-to-user
Parameters
The request body is a JSON object that includes sender information, a list of recipients, the notification payload, and sending options.
- sender
object(required) — Information about the application sending the notification. This is typically populated automatically when using the helper function.- appDid
string(required) — The DID of the blocklet sending the notification. - appSk
string(required) — The secret key of the blocklet for signing the request.
- appDid
- receiver
string | string[](required) — The DID of the user or an array of user DIDs to receive the notification. - notification
object(required) — The content of the notification. The structure should conform to the notification schema.- type
string(default:notification) — The type of the notification. Common values include 'notification', 'passthrough', 'hi', 'connect'. - title
string(required) — The title of the notification. - body
string(required) — The main content or message body of the notification. - actions
array— An array of action objects that can be presented to the user. - attachments
array— An array of attachment objects.
- type
- options
object— Additional options to control the delivery.- channels
string[](default:["app", "email", "webhook", "push"]) — An array of channels to send the notification through. Possible values are app (DID Wallet), email, webhook, and push (PushKit). - keepForOfflineUser
boolean(default:true) — If true, messages for offline users will be stored and delivered upon their next connection.
- channels
Code Example
The most straightforward way to send a notification is by using the sendToUser helper function from within your blocklet's backend code. This function handles the necessary authentication and API call structure.
Send a notification to a user
const Notification = require('@blocklet/sdk/lib/util/send-notification');

async function sendWelcomeNotification(userDid) {
  const { wallet } = await req.getBlockletInfo();

  const notification = {
    title: 'Welcome!',
    body: 'Thank you for joining our application.',
    actions: [
      {
        type: 'link',
        name: 'Get Started',
        url: 'https://example.com/getting-started',
      },
    ],
  };

  try {
    const result = await Notification.sendToUser(
      userDid,
      notification,
      {
        appDid: wallet.address,
        appSk: wallet.secretKey,
      },
      process.env.ABT_NODE_SERVICE_PORT
    );
    console.log('Notification queued successfully:', result);
  } catch (error) {
    console.error('Failed to send notification:', error.message);
  }
}
This example defines a simple welcome notification and sends it to a specified user DID. The getBlockletInfo method retrieves the necessary credentials to authenticate the request.
Channel-Specific Behavior
- DID Wallet: If a user is online, the message is delivered instantly via WebSocket. If the user is offline, the message is cached and delivered the next time they connect, provided
keepForOfflineUseristrue. - Email: The system uses predefined templates to render the notification content into an HTML email. This requires the Email Service to be properly configured by the administrator in the dashboard.
- Push Notifications: The service retrieves the user's device token from their session data and forwards the notification to a configured PushKit blocklet, which then handles the platform-specific delivery to APNs (iOS) or FCM (Android).
- WebHooks: The service sends the notification payload to all webhook URLs configured by the user in their profile settings.
Responses
- 200 OK: The notification has been successfully queued for delivery. The response body contains the created notification object(s) with their unique IDs.
- 400 Bad Request: The request is malformed. This could be due to an invalid sender token, a notification object that fails validation, or an invalid receiver DID. The response body will contain a descriptive error message.
Example Response (Success)
Example Success Response
[
  {
    "id": "z8iZp8d7a9E5fG3bC1hJ2kL4mN6oP8qR0tV",
    "receiver": "z1...",
    "componentDid": "z2...",
    "teamDid": "z3...",
    "type": "notification",
    "status": "pending",
    "title": "Welcome!",
    "body": "Thank you for joining our application.",
    "createdAt": "2023-10-27T10:00:00.000Z",
    "updatedAt": "2023-10-27T10:00:00.000Z"
  }
]
Summary
The Notification Service provides a powerful and flexible way to engage with your users. By leveraging its multi-channel capabilities, you can ensure that your messages reach users on their preferred platform, enhancing the overall user experience of your application. For administrative tasks such as viewing notification history and configuring channels, please see the Notifications User Guide.