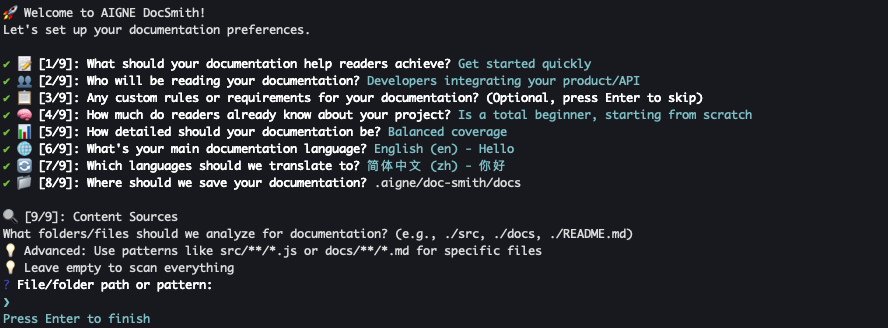
This guide provides a step-by-step walkthrough of the interactive setup process for AIGNE DocSmith. This procedure runs automatically the first time you execute aigne doc create, but you can also start it manually. The goal is to create a config.yaml file, which stores your preferences for generating documents.
How to Start the Setup Process
To begin the configuration manually, navigate to your project's root directory in a terminal and run the following command:
aigne doc init
aigne doc initThis command starts a 9-step interactive questionnaire to configure your documents settings.
Configuration Steps
The setup process will prompt you with a series of questions. The following sections detail each step.
Step 1: Define Document Purpose
The first step is to establish the primary goals for your documents. This selection influences the tone, structure, and focus of the generated content.
Prompt: 📝 [1/9]: What should your documents help readers achieve?
You can select one or more options from the following list:
| Option | Name | Description |
|---|---|---|
getStarted | Get started quickly | Help new users go from zero to working in under 30 minutes. |
completeTasks | Complete specific tasks | Guide users through common workflows and use cases. |
findAnswers | Find answers fast | Provide a searchable reference for all features and APIs. |
understandSystem | Understand the system | Explain how it works and the reasoning behind design decisions. |
solveProblems | Solve problems | Help users troubleshoot and fix issues. |
mixedPurpose | Mix of above | Cover multiple needs comprehensively. |
Step 2: Identify Target Audience
Next, specify the primary readers of your documents. This helps to adjust the language and technical depth to an appropriate level.
Prompt: 👥 [2/9]: Who will be reading your documents?
You may select multiple audiences from this list:
| Option | Name | Description |
|---|---|---|
endUsers | End users (non-technical) | People who use the product but do not write code. |
developers | Developers integrating | Engineers adding the product to their projects. |
devops | DevOps/Infrastructure | Teams deploying, monitoring, and maintaining systems. |
decisionMakers | Technical decision makers | Architects or leads evaluating the technology for implementation. |
supportTeams | Support teams | People helping others use the product. |
mixedTechnical | Mixed technical audience | A combination of developers, DevOps, and other technical users. |
Step 3: Specify Reader Knowledge Level
Indicate the assumed knowledge level of your audience. This ensures the content is presented effectively, avoiding information that is either too basic or too complex.
Prompt: 🧠 [3/9]: How much do your readers already know about your project?
Select the option that best describes your readers:
| Option | Name | Description |
|---|---|---|
completeBeginners | Complete beginners | New to the domain or technology entirely. |
domainFamiliar | Domain-familiar, tool-new | Know the problem space but are new to this specific solution. |
experiencedUsers | Experienced users | Regular users who need reference material or advanced topics. |
emergencyTroubleshooting | Emergency/troubleshooting | Users who have encountered a problem and need to fix it quickly. |
exploringEvaluating | Exploring/evaluating | Users trying to determine if the tool fits their needs. |
Step 4: Set Document Depth
Choose how detailed the documents should be. This parameter determines the scope and level of detail in the generated content.
Prompt: 📊 [4/9]: How detailed should your documents be?
Select one of the following levels:
| Option | Name | Description |
|---|---|---|
essentialOnly | Essential only | Covers the most common 80% of use cases concisely. |
balancedCoverage | Balanced coverage | Provides good depth with practical examples. |
comprehensive | Comprehensive | Covers all features, edge cases, and advanced scenarios. |
aiDecide | Let AI decide | The tool analyzes code complexity to suggest an appropriate depth. |
Step 5: Select Primary Language
Choose the main language for your documents. The system will detect your operating system's language and suggest it as the default.
Prompt: 🌐 [5/9]: What is the main language of your documents?
You can select from a list of 12 supported languages, including English, Chinese (Simplified), and Spanish.
Step 6: Choose Translation Languages
Select any additional languages into which you want the documents to be translated.
Prompt: 🔄 [6/9]: What languages should we translate to?
You can choose multiple languages from the supported options, excluding the primary language selected in the previous step.
Step 7: Define Document Directory
Specify the folder where the created document files will be saved.
Prompt: 📁 [7/9]: Where should we save your documents?
The default path is .aigne/doc-smith/docs. You can accept this default or provide a different path.
Step 8: Specify Content Sources
Indicate which files, folders, or URLs the tool should analyze to generate documents. You can add multiple paths and use glob patterns for more specific file matching.
Prompt: 🔍 [8/9]: Data Sources
You will be prompted to enter file paths (e.g., ./src), glob patterns (e.g., src/**/*.js), or URLs (e.g., https://example.com/openapi.yaml). If no paths are provided, the tool will analyze the entire project directory by default.
Step 9: Provide Custom Rules
This optional step allows you to provide specific instructions or constraints for the AI to follow during content creation.
Prompt: 📋 [9/9]: Do you have any custom rules or requirements for your documents? (Optional, press Enter to skip)
You can input any requirements, such as tone, style, or content to exclude. For example: "Focus on technical accuracy and avoid marketing terminology."
The config.yaml File
After you answer all the questions, DocSmith saves your responses to a configuration file named config.yaml, located in the .aigne/doc-smith/ directory of your project. This file acts as the blueprint for all future document creation and can be manually edited at any time.
Below is an example of a generated config.yaml file:
config.yaml
# Project information for documentation publishing
projectName: AIGNE DocSmith
projectDesc: AIGNE DocSmith is a powerful, AI-driven documentation creation tool...
projectLogo: https://docsmith.aigne.io/image-bin/uploads/9645caf64b4232699982c4d940b03b90.svg

# AI Thinking Configuration
thinking:
  effort: standard

# =============================================================================
# Documentation Configuration
# =============================================================================

# Purpose: What's the main outcome you want readers to achieve?
documentPurpose:
  - getStarted
  - completeTasks

# Target Audience: Who will be reading this most often?
targetAudienceTypes:
  - endUsers

# Reader Knowledge Level: What do readers typically know when they arrive?
readerKnowledgeLevel: completeBeginners

# Documentation Depth: How comprehensive should the documentation be?
documentationDepth: comprehensive

# Custom Rules: Define specific documentation creation rules and requirements
rules: |
  Avoid using vague or empty words that don't provide measurable or specific details...

# Target Audience: Describe your specific target audience and their characteristics
targetAudience: |

# Language settings
locale: en
translateLanguages:
  - zh
  - zh-TW
  - ja

# Paths
docsDir: ./docs  # The directory where the created documents will be saved.
sourcesPath:  # The source code paths to analyze.
  - ./README.md
  - ./agents

# Image filtering settings
media:
  minImageWidth: 800
Summary and Next Steps
Once the setup is complete, you will see a confirmation message displaying the path to your new configuration file.
With your initial configuration saved, you are now prepared to create your documents.