The PutNftObjectCommand is a specialized command designed to upload a digital asset (like an image, video, or audio file) and simultaneously create or update its associated DID Document. This process effectively links a decentralized identifier (DID) to a specific piece of data, a crucial step in managing Non-Fungible Tokens (NFTs) and other verifiable digital assets within DID Spaces.
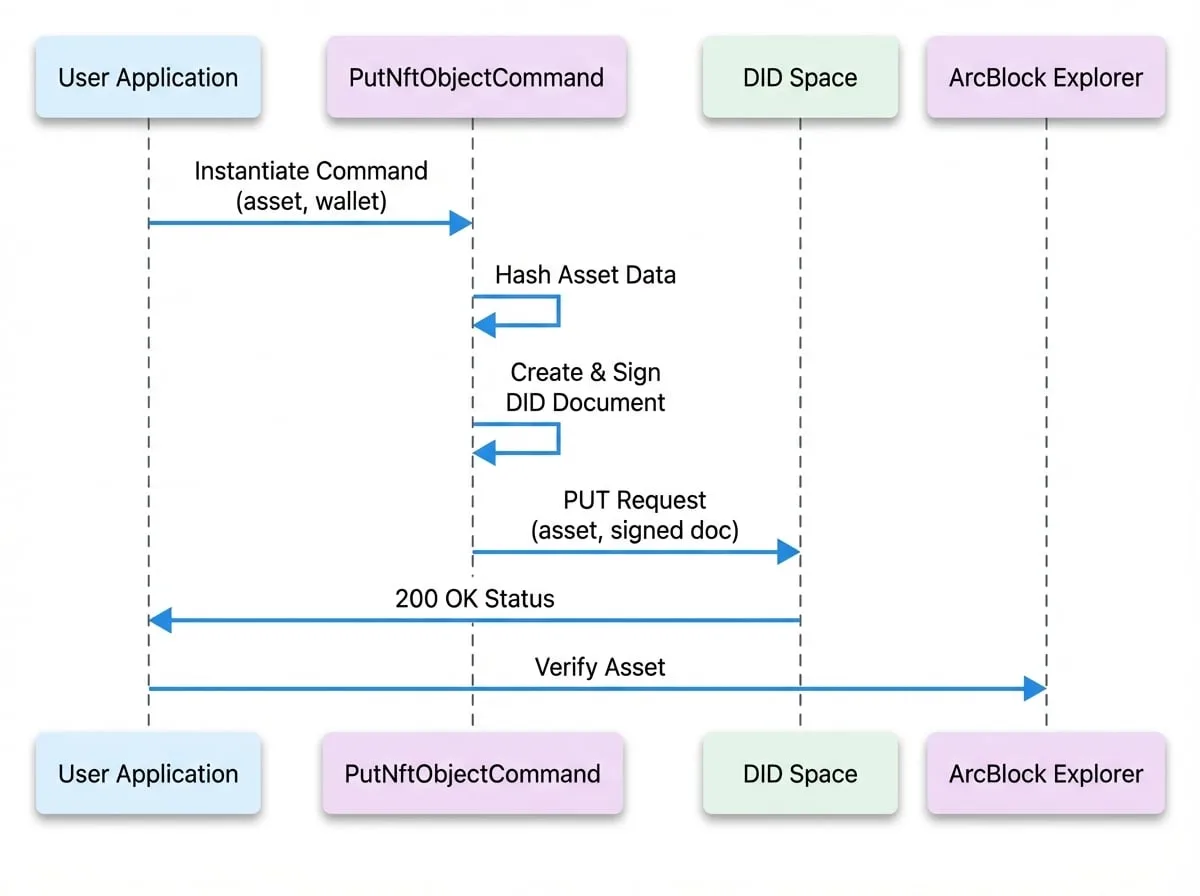
This command automates several complex steps: it calculates the hash of the asset, constructs a valid DID Document specifying the asset's location and integrity hash, and signs the document using a controller wallet to prove ownership. It then bundles the asset and the signed document into a single request to the DID Space.
Workflow Overview
The following diagram illustrates the typical workflow when using PutNftObjectCommand:
Input
The PutNftObjectCommand requires the following input parameters to be provided to its constructor.
- did
string(required) — The DID of the asset. This is the identifier that the uploaded object and DID Document will be associated with. - controller
WalletObject(required) — The wallet object that has control over the asset's DID. This wallet will be used to sign the generated DID Document, proving ownership. - chainHost
string(required) — The base URL for the blockchain explorer API (e.g., 'https://beta.abtnetwork.io/api/'). This is used to construct the explorer service endpoint in the DID Document. - display
object(required) — An object containing the configuration for the display asset.- key
string(required) — The filename of the asset (e.g., 'my-nft-image.png'). This should not include any path. - data
Readable(required) — A readable stream representing the content of the asset file.
- key
Output
The command returns a standard output object.
- statusCode
number— The HTTP status code of the response. A value of200indicates that the NFT object and its DID document were successfully uploaded. - data
void— On a successful request, the data field is empty.
Example
Here is a complete example of how to use PutNftObjectCommand to upload an NFT asset.
First, ensure you have a file to upload, for example, my-nft.png.
Example
import { SpaceClient, PutNftObjectCommand } from '@blocklet/did-space-js';
import getWallet from '@blocklet/sdk/lib/wallet';
import * as fs from 'fs';
import * as path from 'path';

async function uploadNftAsset() {
  const wallet = getWallet(); // Assumes a wallet is available in the environment

  const client = new SpaceClient({
    endpoint: 'https://www.didspaces.com/app/api/space/...',
    wallet: wallet,
  });

  // 1. Prepare the file stream for the NFT asset
  const filePath = path.join(__dirname, 'my-nft.png');
  // Ensure the file exists before creating a stream
  if (!fs.existsSync(filePath)) {
    console.error(`File not found: ${filePath}`);
    // As a placeholder, create a dummy file for the example to run
    fs.writeFileSync(filePath, 'This is a dummy NFT file.');
  }
  const fileStream = fs.createReadStream(filePath);

  // 2. Define the command input
  const commandInput = {
    // The DID of the asset you are uploading
    did: 'z8iZnaYxnkMD5AKRjTKiCb8pQr1ut8UantAcf',
    // The wallet that controls this asset DID
    controller: wallet,
    // The host of the blockchain explorer
    chainHost: 'https://beta.abtnetwork.io/api/',
    display: {
      key: 'my-nft.png',
      data: fileStream,
    },
  };

  // 3. Create and send the command
  const command = new PutNftObjectCommand(commandInput);
  const output = await client.send(command);

  // 4. Check the result
  if (output.statusCode === 200) {
    console.log('NFT asset uploaded successfully!');
  } else {
    console.error('Failed to upload NFT asset:', output);
  }
}

uploadNftAsset();
Best Practices
DID Document Automation
The primary advantage of PutNftObjectCommand is its automation of DID Document creation and signing. When you send the command, it performs the following actions internally:
Hashing
It reads the
datastream and computes the SHA3-256 hash of the file content. This hash is embedded in the DID Document to guarantee the integrity of the asset.Document Construction
It assembles a DID Document containing essential metadata, including service endpoints for accessing the display asset and viewing it on a block explorer.
Signing
It signs the entire DID Document using the provided
controllerwallet's private key. This cryptographic signature is verifiable and proves that the controller authorized this specific version of the document.
Controller Wallet
The controller wallet is fundamental to the security and ownership model. Ensure that the wallet provided has the authority to manage the specified asset did. This wallet's public key is included in the DID Document's verificationMethod, allowing anyone to verify the signature.