The @arcblock/did-connect-react library provides a comprehensive set of React components and hooks designed to seamlessly integrate decentralized identity (DID) capabilities into your web applications. It simplifies the process of user authentication and session management using ArcBlock's DID Wallet, offering a secure and user-friendly alternative to traditional login systems.
This library is built to be flexible and easy to use, whether you need a complete out-of-the-box solution or granular control over the authentication flow.
Key Features
Complete Connection UI
Includes the `DidConnect` component, a pre-built, customizable modal for handling the entire QR code scanning and connection process.
Seamless Session Management
Leverage the `SessionProvider` and `useSession` hook to effortlessly manage user login states, sessions, and profile data throughout your application.
Flexible Programmatic Control
Use hooks like `useConnect` to programmatically open, close, and manage the connection modal, giving you full control over the user experience.
Rich UI Toolkit
A collection of supplementary UI components like `Avatar`, `Address`, and `Button` to display user identity information consistently.
Core Architecture
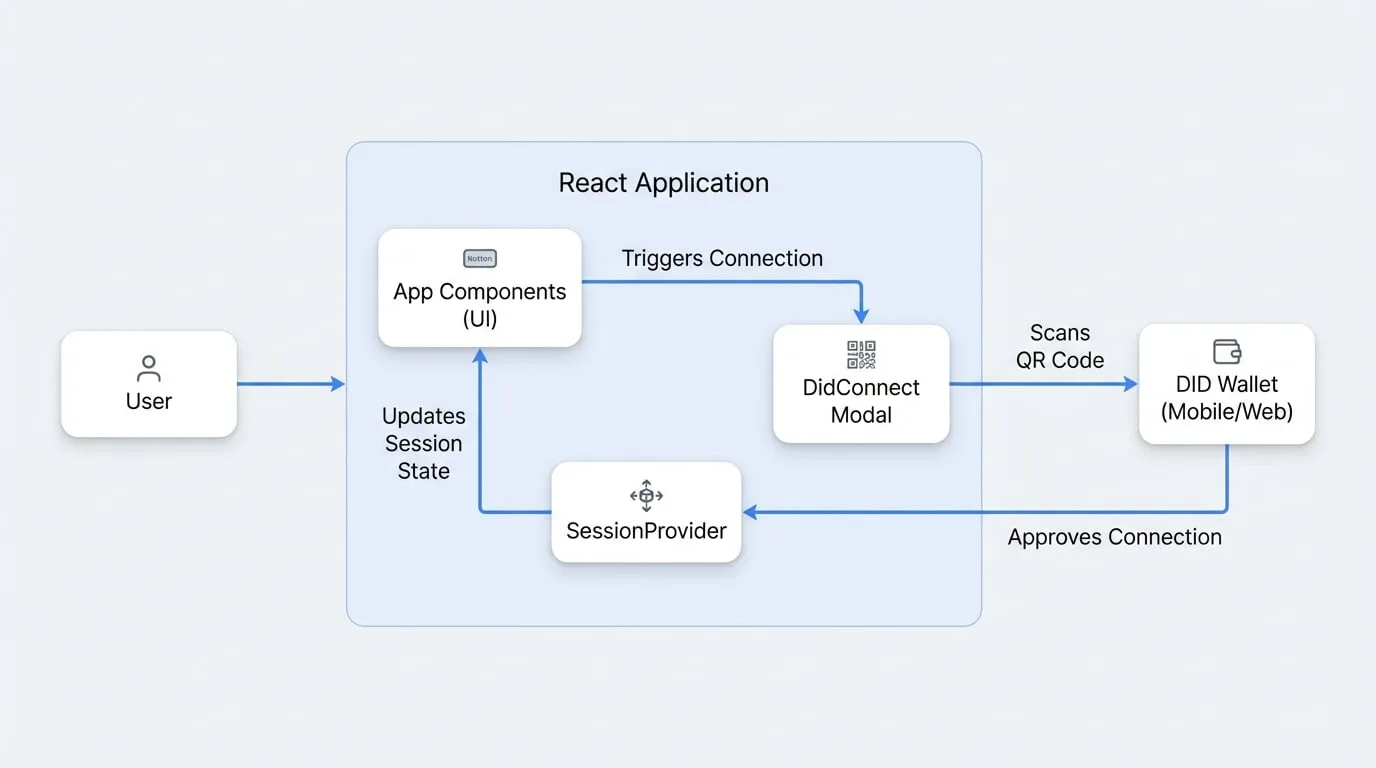
The library revolves around a central SessionProvider that manages the user's session state. UI components like Button can trigger the DidConnect modal, which handles the secure, QR-code-based interaction with the user's DID Wallet. Once the connection is complete, the session is updated, and your application's UI reacts accordingly.
It's important to note that @arcblock/did-connect-react is a client-side library and requires a corresponding backend service to handle the authentication logic. This service should be built using the @arcblock/did-connect-js library for Node.js.
Installation
To get started, add the library to your project using yarn or npm.
Installation
# With yarn
yarn add @arcblock/did-connect-react

# With npm
npm install @arcblock/did-connect-react
How It Works: A Quick Look
Here is a minimal example of how to set up a login flow. The application is wrapped in a SessionProvider, and a Button is used to toggle the DidConnect modal.
App.js
import React from 'react';
import axios from 'axios';
import { SessionProvider, SessionConsumer } from '@arcblock/did-connect-react/lib/Session';
import DidConnect from '@arcblock/did-connect-react/lib/Connect';
import Button from '@arcblock/did-connect-react/lib/Button';

const webWalletUrl = 'https://web.abtwallet.io/';

function App() {
  const [isConnectOpen, setConnectOpen] = React.useState(false);

  const handleClose = () => setConnectOpen(false);
  const handleSuccess = () => {
    // Redirect or update UI after successful login
    window.location.reload();
  };

  return (
    <SessionProvider serviceHost="/">
      <div className="main-content">
        <SessionConsumer>
          {({ session }) => {
            if (session.loading) {
              return <div>Loading session...</div>;
            }

            return session.user ? (
              <div>
                <h2>Welcome, {session.user.did}!</h2>
                <button onClick={() => session.logout()}>Logout</button>
              </div>
            ) : (
              <Button onClick={() => setConnectOpen(true)}>Connect Wallet</Button>
            );
          }}
        </SessionConsumer>
      </div>

      <DidConnect
        popup
        open={isConnectOpen}
        action="login"
        checkFn={axios.get}
        onClose={handleClose}
        onSuccess={handleSuccess}
        messages={{
          title: 'Login to My App',
          scan: 'Scan QR code with your DID Wallet',
          confirm: 'Confirm login on your wallet',
          success: 'You have successfully signed in!',
        }}
        webWalletUrl={webWalletUrl}
      />
    </SessionProvider>
  );
}

export default App;
This example demonstrates how to manage user sessions and trigger the login process with just a few components.
Next Steps
Now that you have a basic understanding of the library, you're ready to dive deeper.
Getting Started
Follow our step-by-step guide to integrate DID Connect into your own application from scratch.
Start Building