Transaction Lifecycle
Every action that modifies the state of the blockchain, such as transferring tokens or creating an asset, is executed through a transaction. Understanding the lifecycle of a transaction is fundamental to building applications with the OCAP Client. This process involves four main stages: Preparation, Encoding, Signing, and Sending.
The OCAP Client provides a flexible set of methods that allow you to either perform these steps individually for maximum control or use high-level helpers that combine them for convenience.
This guide breaks down each stage and illustrates both single-signature and multi-signature workflows.
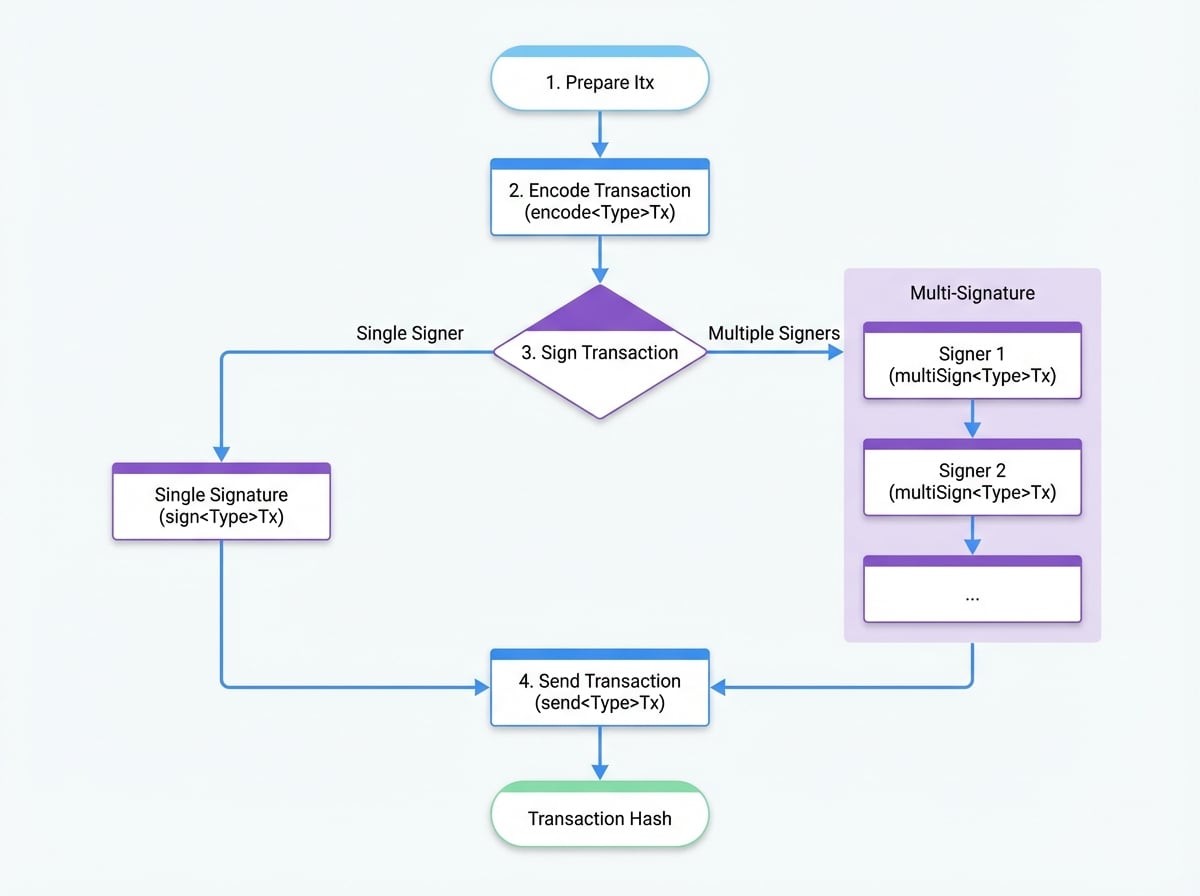
Lifecycle Overview#
The following diagram illustrates the complete journey of a transaction from preparation to its final submission to the blockchain.
Stage 1: Preparation (Creating the itx)#
Every transaction begins with an itx (inner transaction). This is a plain JavaScript object that contains the specific data for the action you want to perform. For example, a transfer itx would include the recipient's address and the amount.
Preparing the itx
// The core data for our transfer transaction
const itx = {
  to: 'z2C8j81aL2oXpA5t42s2h4g9o8p1k6m3n7b', // Recipient's address
  value: await client.fromTokenToUnit(10),   // Amount to send, converted to the chain's base unit
};
Stage 2: Encoding#
Encoding transforms the itx and other metadata into a standardized, binary format that can be cryptographically signed. The client provides an encode{TxType}Tx method for each transaction type (e.g., encodeTransferV2Tx).
During this stage, the client automatically adds essential metadata:
from: The sender's address, derived from the provided wallet.chainId: The identifier of the target blockchain, fetched automatically.nonce: A unique number to prevent replay attacks, which defaults to the current timestamp (Date.now()).pk: The public key of the sender's wallet.
The encoding function returns both the full transaction object and a Buffer of the serialized data, which is used for signing.
Encoding the Transaction
const { object: encodedTx, buffer: txBuffer } = await client.encodeTransferV2Tx({
  tx: { itx },
  wallet: senderWallet,
});

console.log('Encoded TX Object:', encodedTx);
console.log('Buffer to be signed:', txBuffer);
Stage 3: Signing#
Signing proves ownership of the account and authorizes the transaction. The process differs for single-signature and multi-signature workflows.
Single-Signature Workflow#
This is the most common scenario, where a single user signs a transaction. The sign{TxType}Tx methods take the encoded transaction, sign the binary buffer with the user's private key, and populate the signature field.
Signing with a Single Signature
const signedTx = await client.signTransferV2Tx({
  tx: encodedTx, // The object from the encoding step
  wallet: senderWallet,
});

console.log('Signature:', signedTx.signature);
Multi-Signature Workflow#
Multi-signature (multisig) transactions require approval from multiple parties. This is commonly used for atomic swaps or shared accounts. The process is sequential:
- Preparation: The initial transaction is created with a
signaturesListthat defines all required signers. - Sequential Signing: The transaction is passed from one signer to the next. Each signer uses the corresponding
multiSign{TxType}Txmethod to add their signature.
Internally, the multiSign method ensures that each party signs the exact same transaction digest by temporarily stripping all existing signatures before encoding the transaction for signing.
Here’s an example for an ExchangeTx, where two parties swap assets.
Multi-Signature Signing Example
// Step 1: Alice (the offerer) prepares and signs the exchange transaction.
const txFromAlice = await client.prepareExchange({
  offerToken: 10,
  demandToken: 20,
  receiver: bobWallet.address,
  wallet: aliceWallet,
});

// Step 2: The transaction is sent to Bob.
// Bob (the demander) adds his signature to finalize it.
const txFromBob = await client.finalizeExchange({
  tx: txFromAlice, // Transaction signed by Alice
  wallet: bobWallet,
});

console.log('Alice\'s Signature:', txFromBob.signaturesList[0].signature);
console.log('Bob\'s Signature:', txFromBob.signaturesList[1].signature);
Stage 4: Sending#
Once a transaction is fully signed, it can be sent to the blockchain node for processing. The send{TxType}Tx methods handle this final step.
For convenience, these methods can also perform the signing step implicitly if you provide a wallet and an unsigned transaction. The method returns a promise that resolves with the transaction hash upon successful submission.
Sending the Signed Transaction
// Using a pre-signed transaction
const hash = await client.sendTransferV2Tx({ tx: signedTx, wallet: senderWallet });

// Or, letting the send method handle the signing automatically
const hash2 = await client.sendTransferV2Tx({
  tx: { itx }, // Just the inner transaction
  wallet: senderWallet,
});

console.log('Transaction sent! Hash:', hash);
You can also include a commit: true option to make the client wait until the transaction is fully confirmed and included in a block before resolving the promise.
Summary#
The transaction lifecycle provides a robust and flexible framework for interacting with the blockchain. By breaking the process into distinct stages—Preparation, Encoding, Signing, and Sending—the OCAP Client offers developers granular control over transaction creation while also providing simple, high-level helpers for common use cases.
For more details on how transaction fees are handled, see the Gas Payment guide. To understand the different client types available, refer to the Client Architecture documentation.