PaymentKit's credit-based billing system allows customers to replenish their credit balance through top-ups. You can configure a credit currency to be rechargeable, enabling both manual one-time top-ups and automatic recharges when the balance falls below a set threshold.
This guide will walk you through the process of programmatically setting up a credit currency for top-ups. The actual auto-recharge settings for a customer (e.g., the low-balance threshold and recharge amount) are managed directly by the customer through the Payment Kit billing portal, ensuring a seamless user experience.
Top-Up Workflow Overview
Before diving into the implementation, it's helpful to understand the entire top-up process from the user's perspective. When a credit currency is configured for recharge, a checkout link is generated. Your application redirects the user to this link to complete the payment, and PaymentKit automatically handles granting the credits upon success.
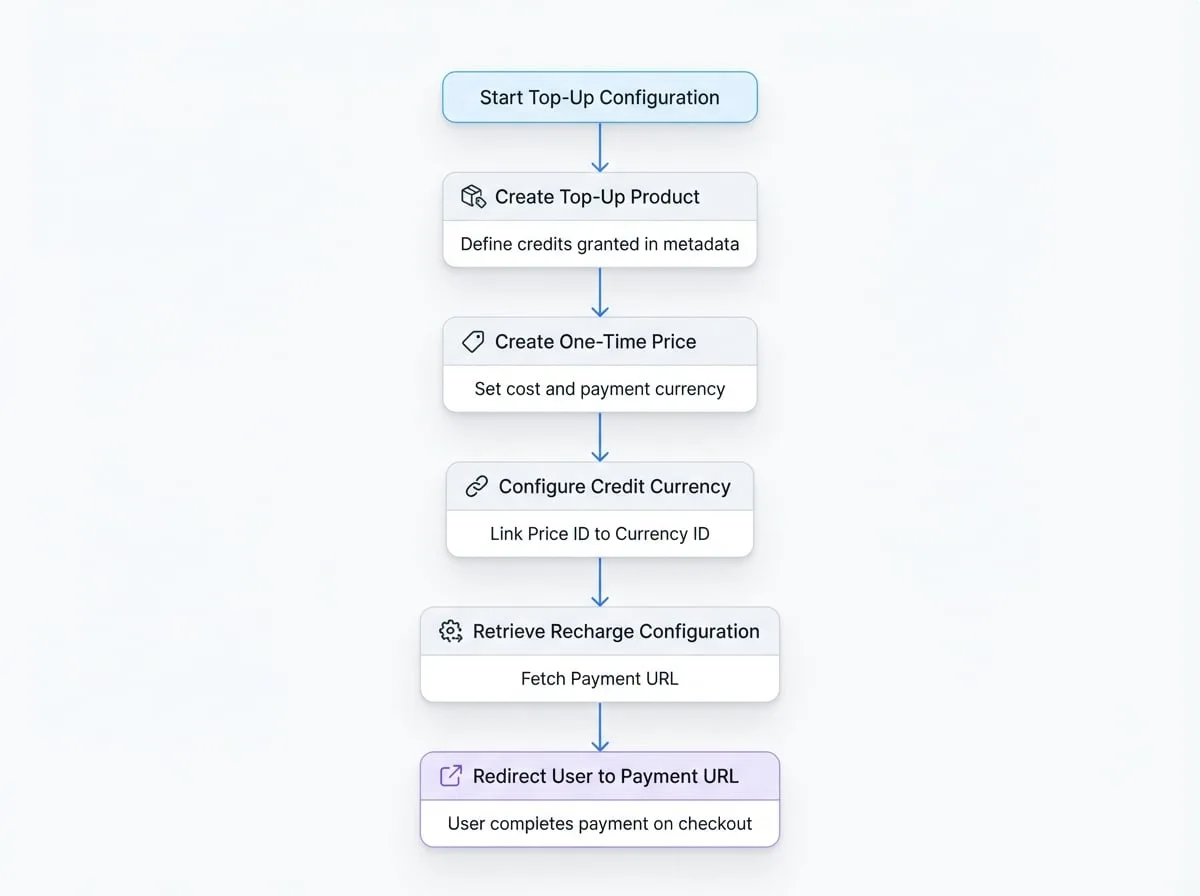
Step 1: Create a Top-Up Package
A top-up package is a standard Product and Price that defines how many credits a customer receives and how much they pay. The key is to embed a credit_config object in the product's metadata.
First, create a product that represents the credit pack. The metadata should specify which credit currency this product replenishes and the amount of credits granted upon purchase.
Create a Product for the Top-Up Package
const topUpProduct = await payment.products.create({
  name: '1000 Credits Pack',
  description: 'Top up your account with 1000 credits.',
  type: 'service',
  metadata: {
    // This product grants credits when purchased
    credit_config: {
      currency_id: 'pc_credit_xxxxxx', // The ID of your credit currency
      amount: '1000', // Amount of credits to grant
    },
  },
});
Next, create a one-time price for this product. This price will determine the cost and the payment currency (e.g., USDT, ETH) for the top-up.
Create a Price for the Top-Up Package
const topUpPrice = await payment.prices.create({
  product_id: topUpProduct.id,
  type: 'one_time',
  unit_amount: '10', // e.g., 10 USDT
  currency_id: 'pc_usdt_xxxxxx', // The currency used to pay for the credits
});
Step 2: Configure the Credit Currency
Once you have a price for your top-up package, you need to link it to your credit currency. This is done using the updateRechargeConfig method, which designates your new price as the base package for recharges.
updateRechargeConfig(id, data)
This method associates a base_price_id with a credit currency, enabling it for top-ups.
Parameters
| Name | Type | Description |
|---|---|---|
id | string | Required. The ID of the credit currency to configure (e.g., pc_credit_xxxxxx). |
data.base_price_id | string | Required. The ID of the Price object that serves as the top-up package. |
Example
Configure a Credit Currency for Recharge
import payment from '@blocklet/payment-js';

async function configureRecharge() {
  try {
    const creditCurrencyId = 'pc_credit_xxxxxx'; // Your credit currency ID
    const topUpPriceId = 'price_yyyyyyyy'; // The price ID from Step 1

    const updatedCurrency = await payment.paymentCurrencies.updateRechargeConfig(
      creditCurrencyId,
      {
        base_price_id: topUpPriceId,
      }
    );

    console.log('Recharge config updated:', updatedCurrency.recharge_config);
  } catch (error) {
    console.error('Error configuring recharge:', error.message);
  }
}

configureRecharge();
Example Response
{
  "currency_id": "pc_credit_xxxxxx",
  "recharge_config": {
    "base_price_id": "price_yyyyyyyy"
  },
  "message": "Recharge config updated successfully"
}
Step 3: Retrieve the Recharge Configuration
To initiate a top-up, your application needs to fetch the payment_url. Use the getRechargeConfig method to retrieve the full recharge configuration, including the checkout URL and details about the base price.
getRechargeConfig(id)
Fetches the recharge configuration for a specified credit currency.
Parameters
| Name | Type | Description |
|---|---|---|
id | string | Required. The ID of the credit currency. |
Returns
Returns an object containing the currency information and its recharge_config. The payment_url within the configuration is the link you'll use to direct users to the checkout page.
Example
Get the Top-Up URL
import payment from '@blocklet/payment-js';

async function getTopUpLink(creditCurrencyId) {
  try {
    const config = await payment.paymentCurrencies.getRechargeConfig(creditCurrencyId);

    if (config.recharge_config && config.recharge_config.payment_url) {
      console.log('Redirect user to this URL:', config.recharge_config.payment_url);
      return config.recharge_config.payment_url;
    } else {
      console.log('Recharge is not configured for this currency.');
      return null;
    }
  } catch (error) {
    console.error('Error fetching recharge config:', error.message);
  }
}

getTopUpLink('pc_credit_xxxxxx');
Example Response
{
  "currency_id": "pc_credit_xxxxxx",
  "currency_info": {
    "id": "pc_credit_xxxxxx",
    "name": "App Credits",
    "symbol": "CRD",
    "decimal": 2,
    "type": "credit"
  },
  "recharge_config": {
    "base_price_id": "price_yyyyyyyy",
    "basePrice": {
      "id": "price_yyyyyyyy",
      "unit_amount": "1000",
      "currency_id": "pc_usdt_xxxxxx",
      // ... other price details
      "product": {
        "id": "prod_zzzzzzzz",
        "name": "1000 Credits Pack",
        // ... other product details
      }
    },
    "payment_url": "https://payment.arcblock.io/checkout/pay/pl_xxxxxxxx"
  }
}
With these steps complete, your credit currency is now fully enabled for top-ups. Your application can fetch the payment URL and provide a seamless way for users to add more credits to their accounts. For more details on the broader credit system, see the Credit-Based Billing guide.