Request Signing
To ensure the security and integrity of every interaction with your DID Space, all API requests are protected by a robust cryptographic signing mechanism. This process guarantees that requests are authentic—sent by the claimed identity—and have not been tampered with in transit.
While the @blocklet/did-space-js SDK handles this process automatically when you use the SpaceClient, understanding how it works is key to building secure applications and troubleshooting potential issues. This process involves two main parts: signing the request on the client-side and verifying it on the server-side.
The Signing Process (Client-Side)#
Before any command is sent to the DID Space API, the SDK performs a series of steps to create a cryptographic signature. This ensures the server can validate the request's origin and integrity.
Here's a breakdown of the steps:
- Create a Digest: The SDK first creates a unique and consistent fingerprint of the request payload. It takes the request's URL, HTTP method, and data, then serializes them into a stable JSON string. This string is then hashed using SHA3-256. This digest ensures that even a single character change in the request will result in a completely different signature.
- Create a JWT: A JSON Web Token (JWT) is assembled. This token's payload includes the digest created in the previous step, the issuer's DID (from the wallet), and an expiration timestamp (typically one hour) to prevent replay attacks.
- Sign the JWT: The entire JWT is then cryptographically signed using the
secretKeyfrom the provided wallet object. This signature proves that the request was initiated by the owner of that wallet. - Attach HTTP Headers: Finally, the SDK attaches the signature and related information to the outgoing HTTP request using the following headers:
x-app-did: The DID of the application's wallet.x-app-pk: The public key corresponding to the wallet that signed the request.x-app-token: The signed JWT created in the previous steps.x-app-delegation(Optional): A token used for delegated authority, explained below.
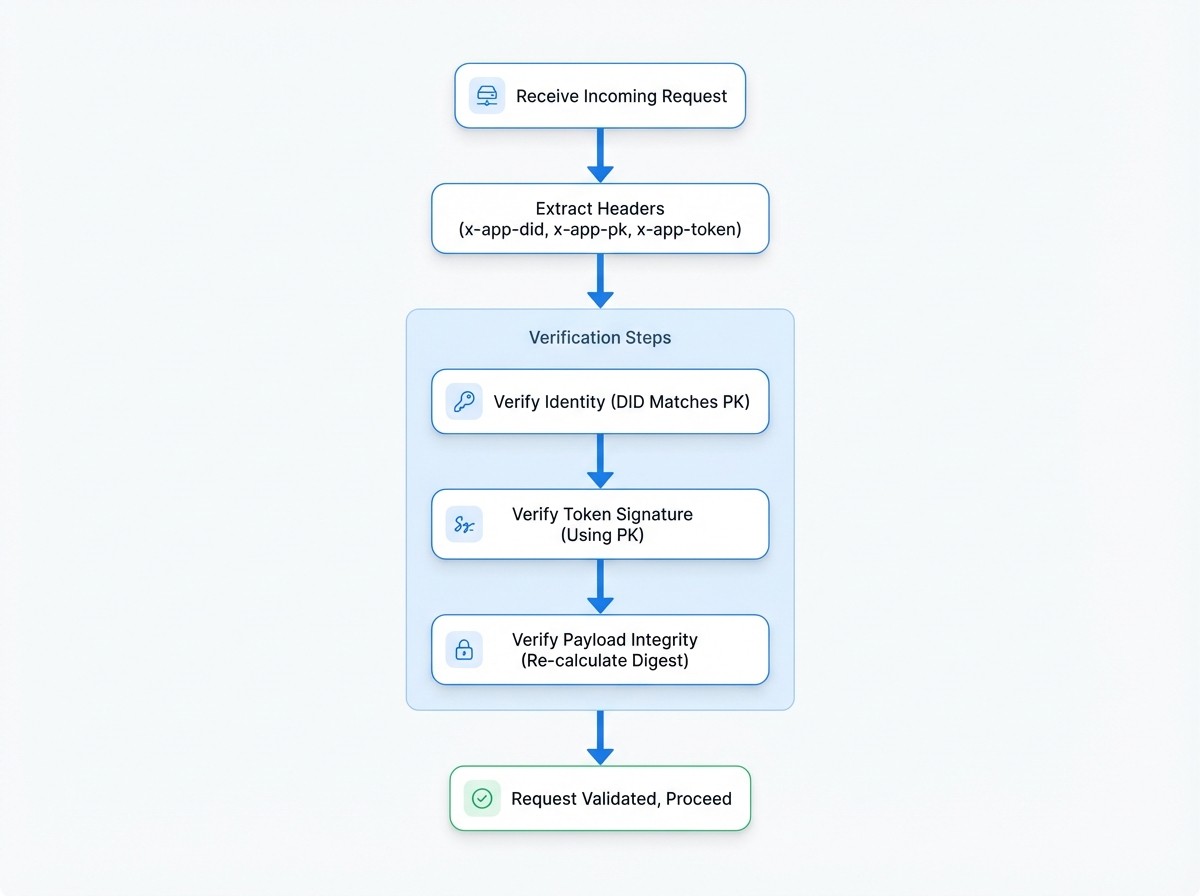
The Verification Process (Server-Side)#
When the DID Space API server receives a request, it performs the reverse process to verify its authenticity and integrity before processing it.
Here are the server's validation steps:
- Extract Headers: The server reads the
x-app-did,x-app-pk, andx-app-tokenheaders from the incoming request. - Verify Identity: It confirms that the provided
x-app-didcorresponds to thex-app-pk. This ensures the public key is a valid key for the given DID. - Verify Token Signature: Using the
x-app-pk(the public key), the server verifies the signature of thex-app-token. A successful verification proves that the token was signed by the holder of the corresponding private key. - Verify Payload Integrity: The server independently re-calculates the SHA3-256 digest from the request's URL, method, and data, using the exact same process as the client. It then compares this newly calculated digest with the
digestfound inside the verified JWT payload. If they match, the server can be certain that the request content has not been altered since it was signed.
If all these checks pass, the server considers the request valid and proceeds to execute it.
Delegated Authority#
A powerful feature of the security model is delegation. This allows a primary wallet (e.g., a user's wallet) to grant temporary, specific permissions to another wallet (e.g., a service or application) to act on its behalf.
This is accomplished using the x-app-delegation header, which contains another JWT. This delegation token is signed by the user and specifies:
from: The user's DID (the delegator).to: The application's DID (the delegatee).permissions: An array of permissions being granted, which must includeDIDSpaceAgentfor this context.
When the server verifies a request with a delegation header, it confirms that the application (delegatee) is authorized to act for the user (delegator). The request is then processed with the user's authority.
Core Functions#
While you won't call them directly when using SpaceClient, the following functions from the @arcblock/jwt and @ocap/mcrypto packages form the foundation of this security model.
signRequest#
This function is used internally by the client to assemble the signature and headers.
signRequest Signature
async function signRequest({
  url,
  method,
  data,
  headers,
  wallet,
  delegation,
}: {
  url: string;
  method: Method;
  data: any;
  headers: { [key: string]: string };
  wallet?: WalletObject;
  delegation?: string;
}): Promise<{ url: string; method: Method; data: any; headers: Headers }>;verifyRequest#
This function represents the logic the server uses to validate an incoming request.
verifyRequest Signature
async function verifyRequest({
  url,
  method,
  data,
  headers,
}: {
  url: string;
  method: Method;
  data: any;
  headers: Headers;
}): Promise<string>; // Returns the authenticated app DID
Understanding this request signing and verification flow provides insight into the robust security measures protecting your data in DID Space. Now that you understand the core security model, you can explore how to apply these concepts in practical scenarios.